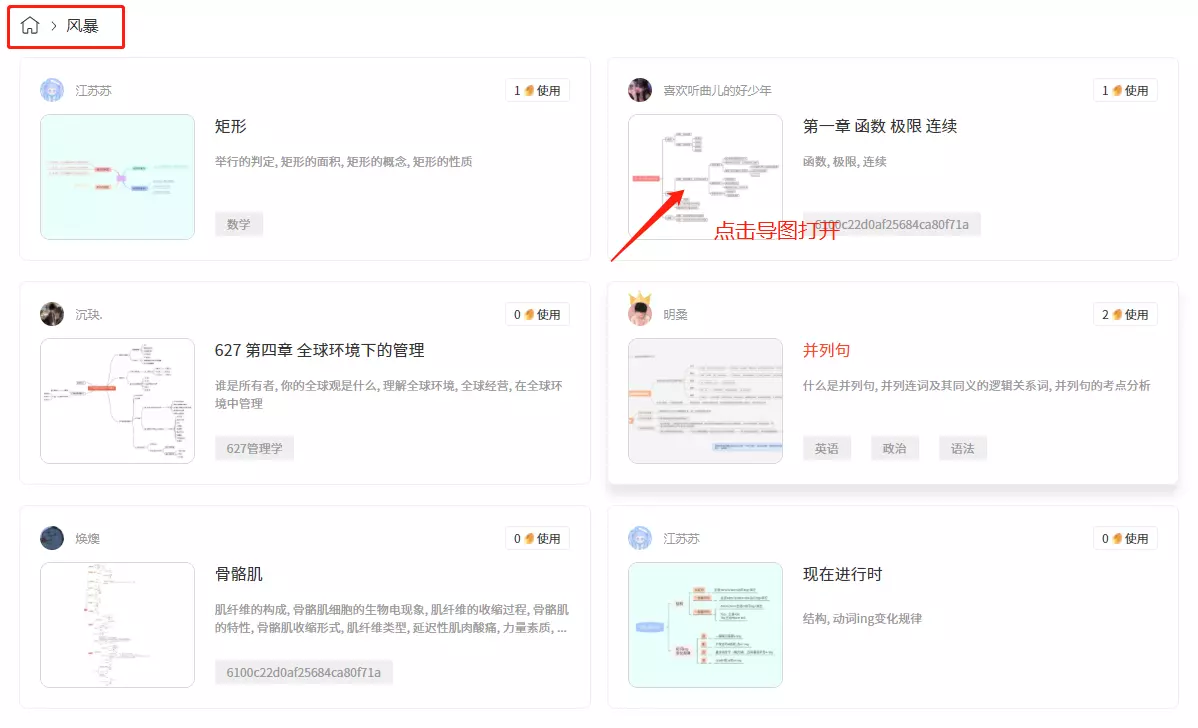
It is a group of people with the same learning interests and knowledge in similar fields to share maps, materials, and achieve knowledge sharing discussions.
The purpose of learning
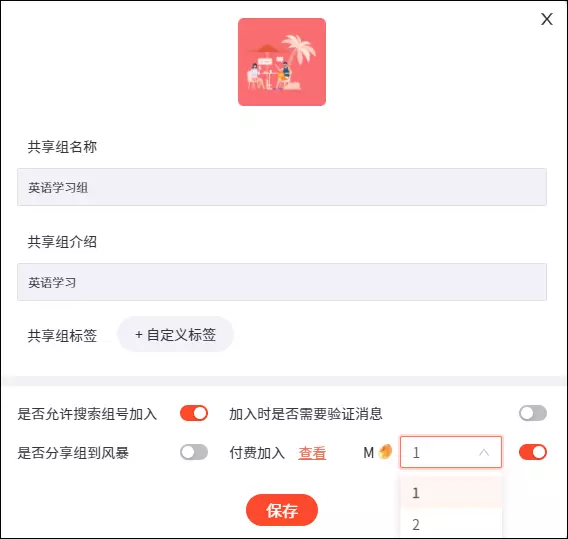
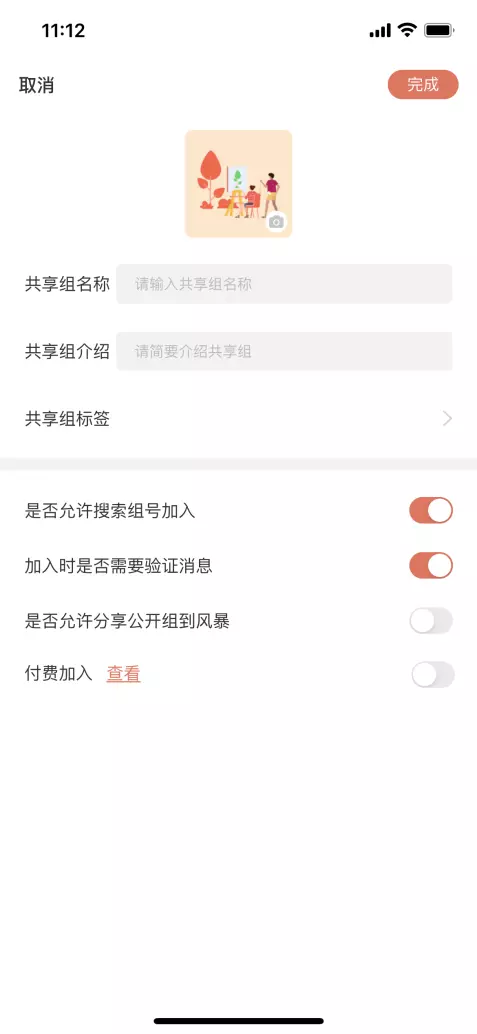
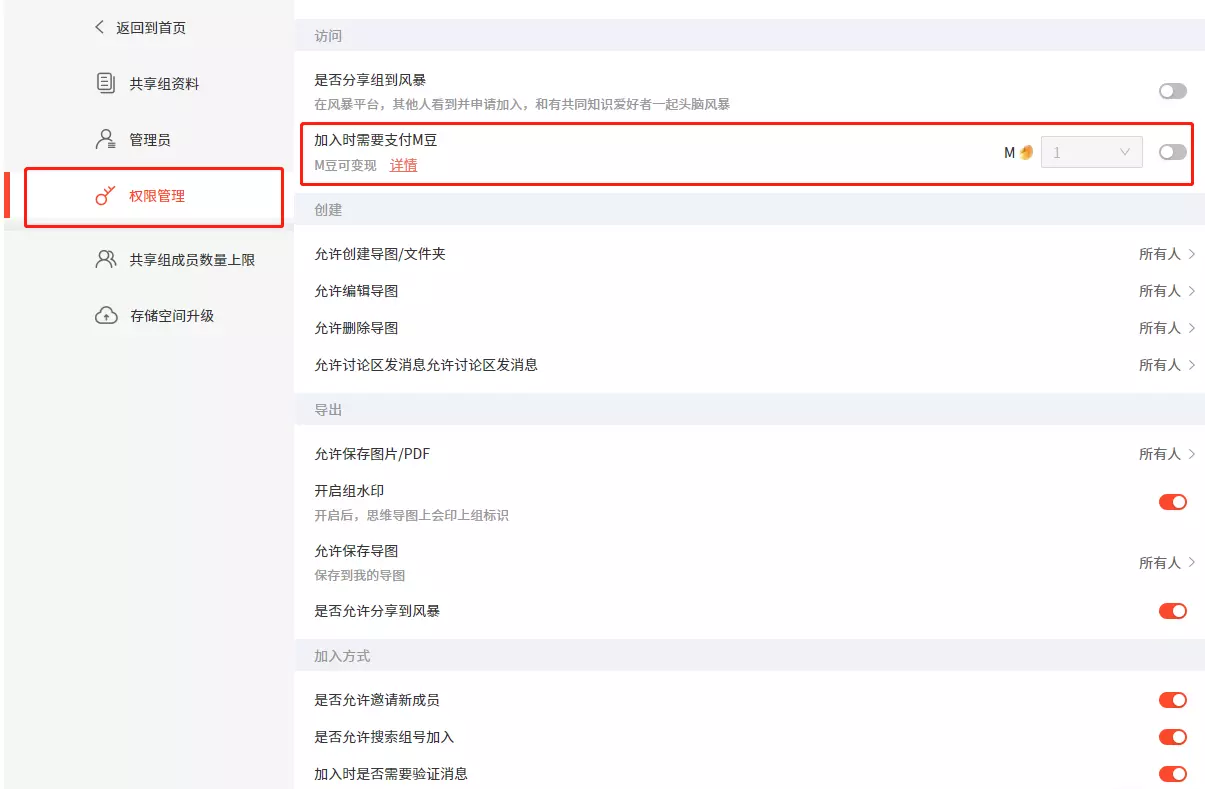
You can set whether group members pay to join a cloud group when creating a group or on the group settings page after creating the group, as shown in the figure:
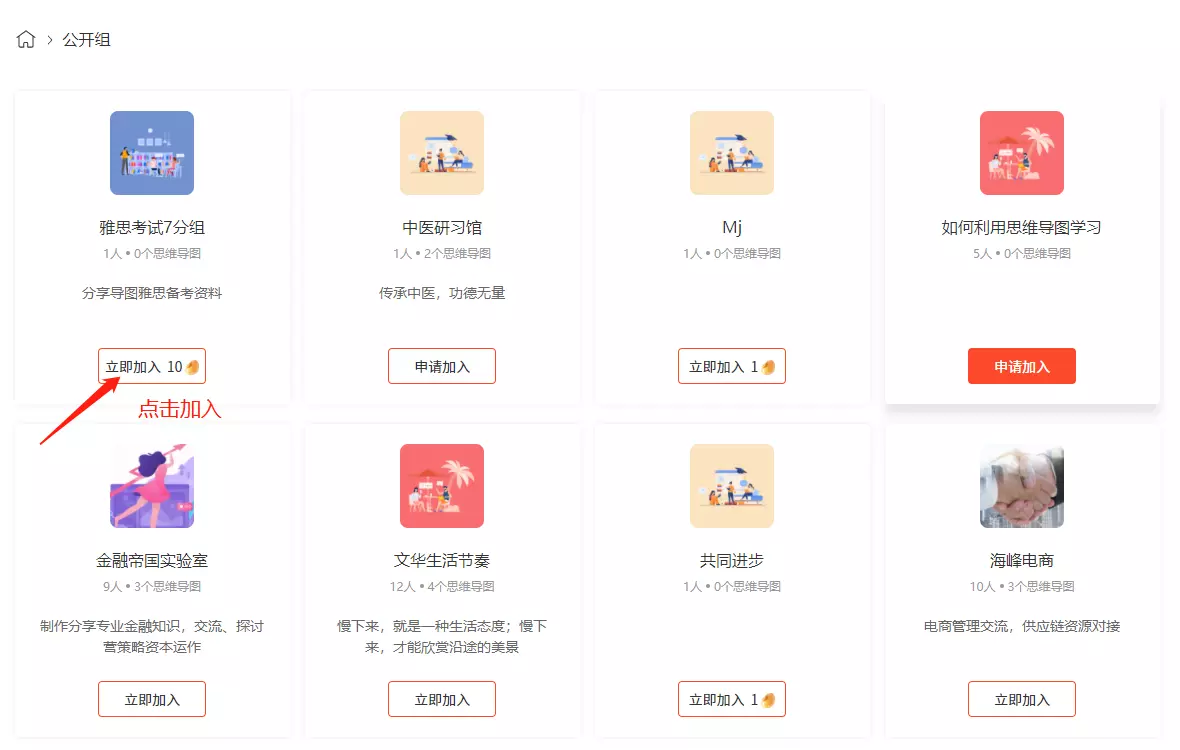
When joining a public group, users can join a free group or pay to join a group. As shown in the picture:
Users share their own map knowledge and show it to everyone. Viewers can like and comment on the map content to achieve the goal of sharing knowledge and promoting mutual learning.
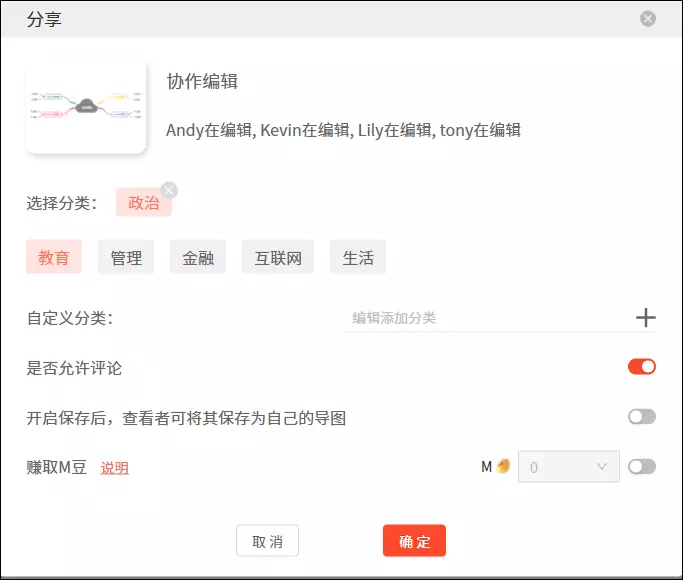
On the edit page, click Share to Storm, make settings, and choose whether to earn M beans, etc., as shown in the picture:
Users can choose to use Storm content for free or for a fee, as shown in the picture:

1. iOS Phone/iPad: You can download the app by searching for “Simple Mind Map”/“Mind Map” in the iOS App Market.
2. Android Phone/Android Tablet: You can use it on the Android App Market, such as the Huawei App Store, Xiaomi App Store, Tencent App Store, Oppo App Store, Vivo App Store, 360 App Store, Baidu App Store, Cocoa App Store, Anzhi Market, and Google Market.
3. Official website download: Log in to mindyushu.com, go to the download page, scan the QR code to download.
Click My and click the profile picture to set the profile picture, nickname, user signature, etc.
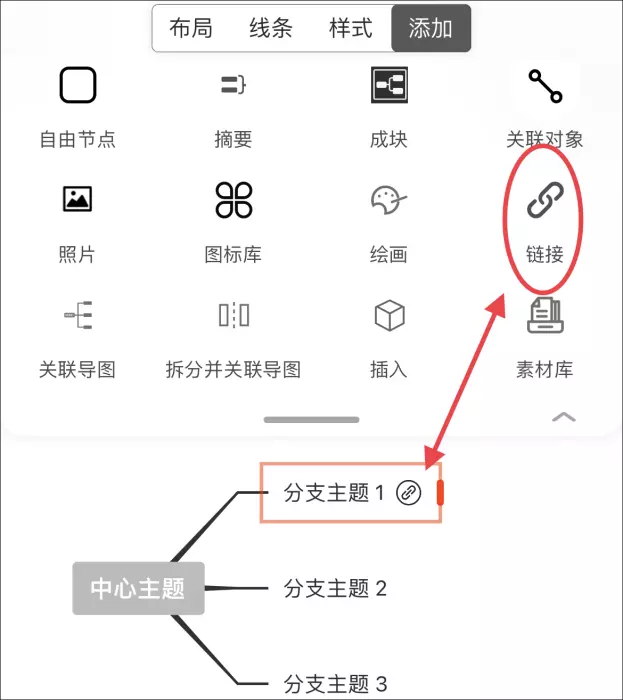
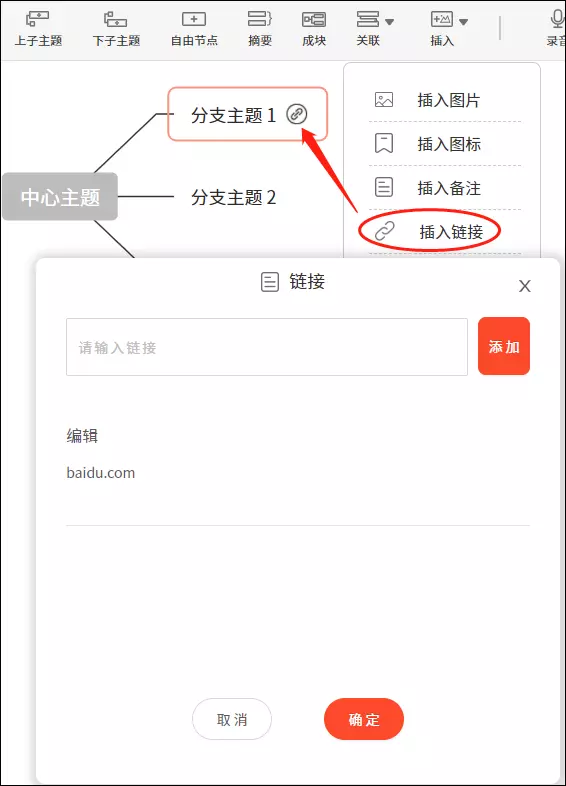
Select the node you want to insert, click Add, click the link, and enter the link address, as shown in the image
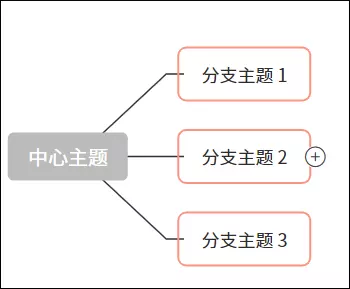
After entering the creation page, the top button adds buttons for each sub-node in different positions, as shown in the image:
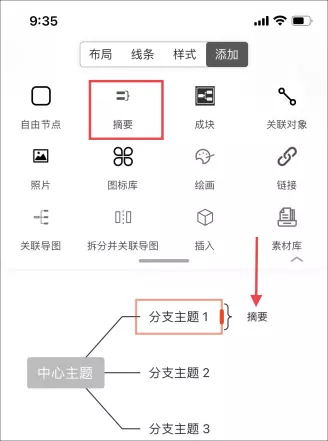
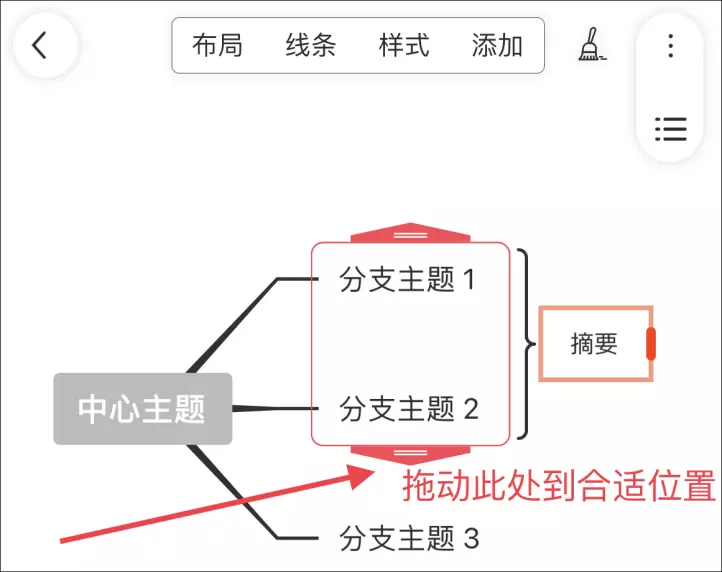
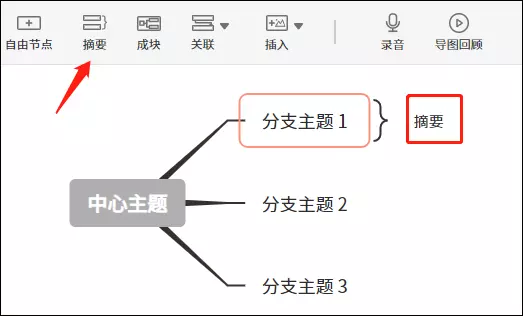
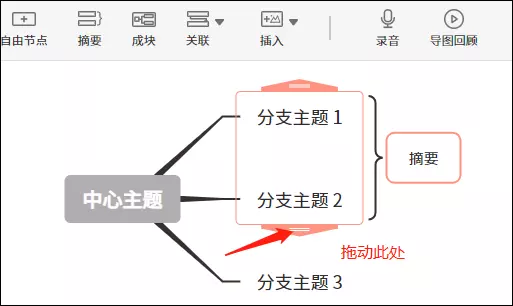
Click the node you want to add, click on the top menu bar, click Add, and click Summary, as shown in the image:
Add a summary to multiple nodes: just click on the summary and drag the following drag bar to the appropriate position, as shown in the image:
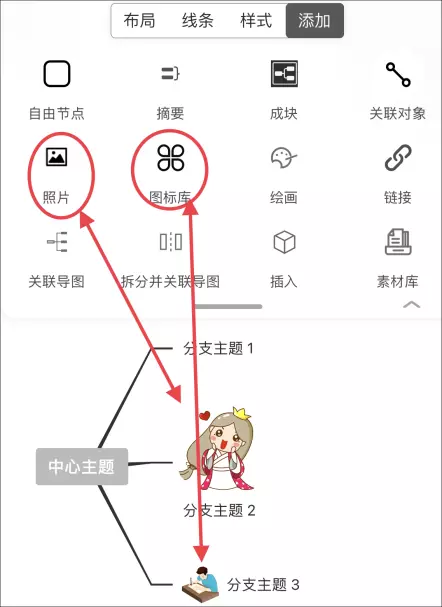
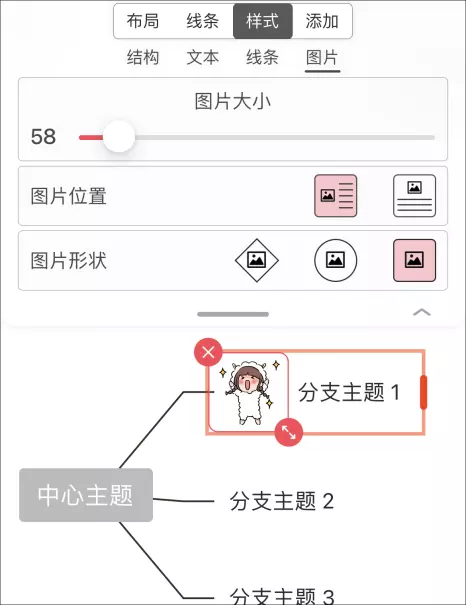
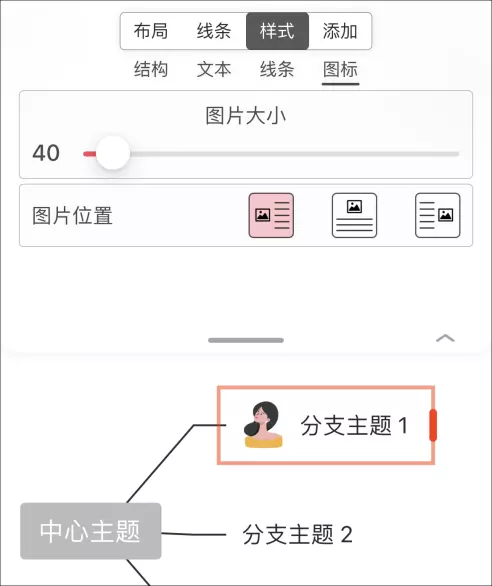
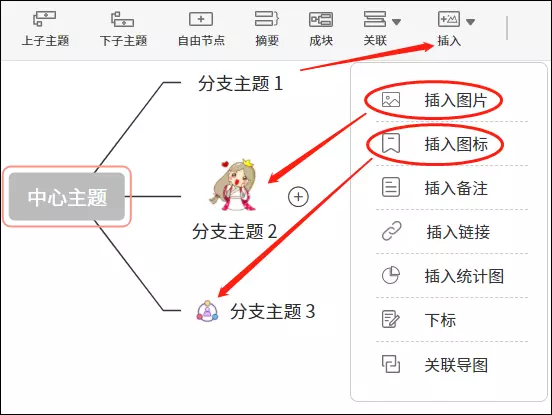
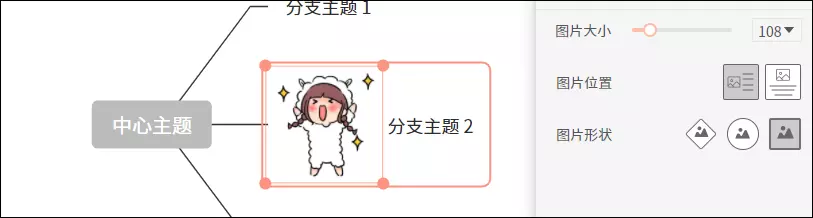
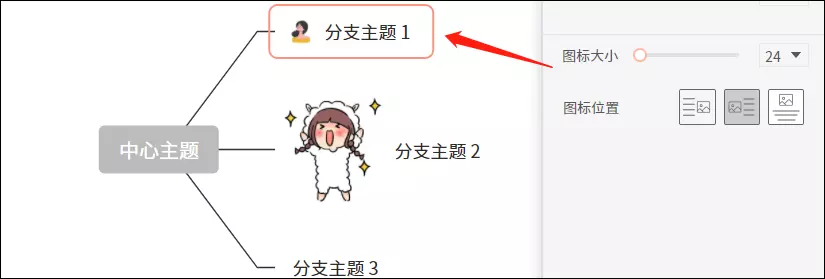
Click on the node you want to add, click on the image in the addition, select from the album/material library, select the image you want to insert; click on the image, click on the style, and set the image. Click on the icon library in Add and select the desired icon from several categories to insert; click on the icon, click on the style, and set the image. As shown in the picture:
Click on the node you want to add, click on the image in the addition, select from the album/material library, select the image you want to insert; click on the image, click on the style, and set the image. Click on the icon library in Add and select the desired icon from several categories to insert; click on the icon, click on the style, and set the image. As shown in the picture:
Click on the node you want to add, click on the top menu bar, click Add, and click on the block, as shown in the image:
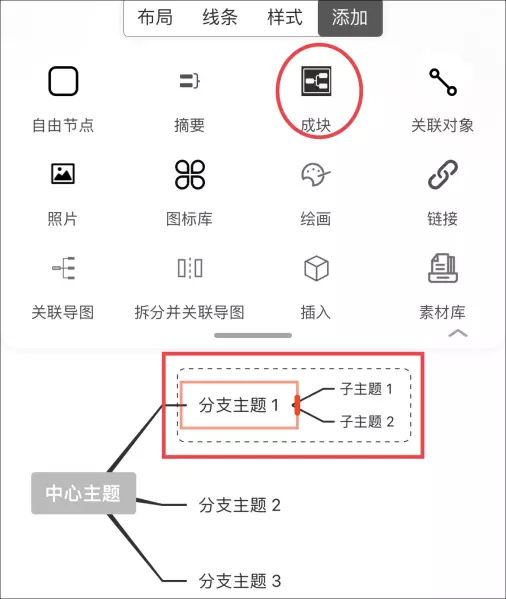
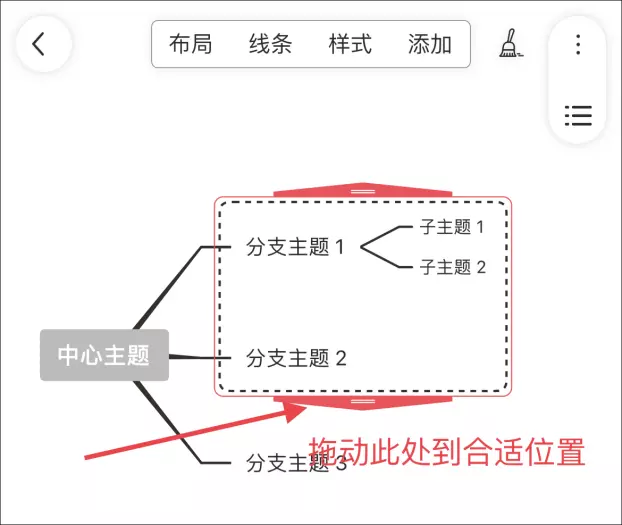
Add multiple nodes into blocks: After a single node is added as a block, click on the block, drag the area box, and drag the required node position, as shown in the image:
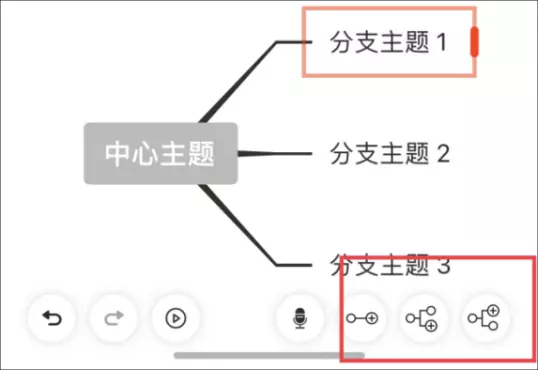
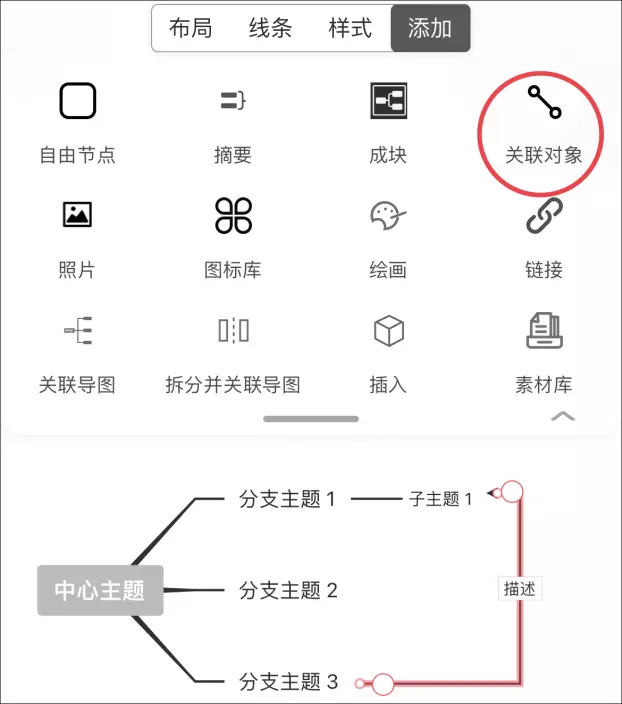
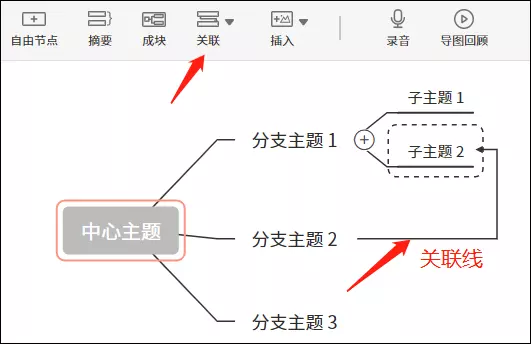
Click on the first node that needs to be associated, then click on the link in Add to select the appropriate line style, then click on the second node that needs to be associated, adjust the line position, and add descriptive text in the description section, as shown in the image:
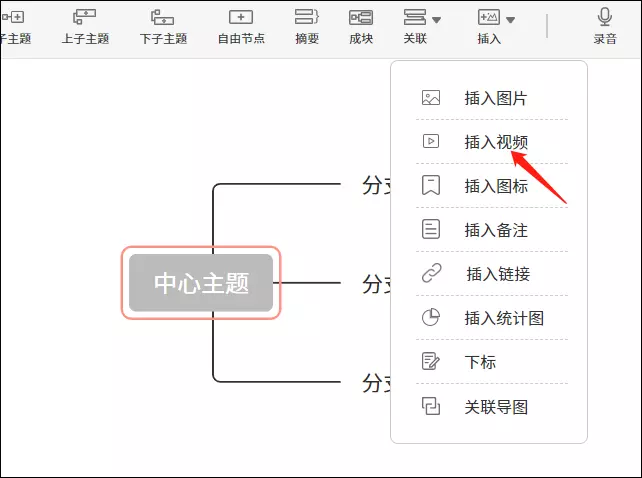
Click Add in the top menu bar, click Video, and select the video you want to insert, select, crop, and automatically add. You can only insert Xiaoyu's 10G size video. The insertion process takes some time, don't worry), or you can delete the video and re-insert the video.
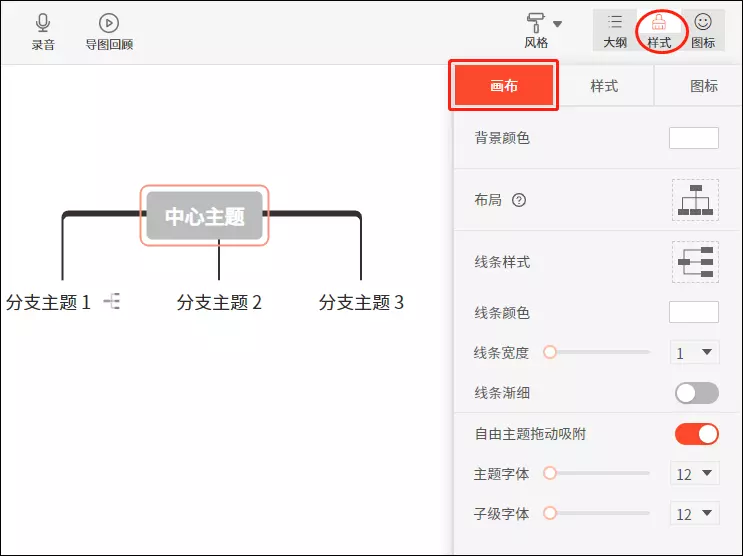
Click on an empty space in the background of the map and click on the top menu bar style. You can set the background color, overall map line, line color, line width, and line details

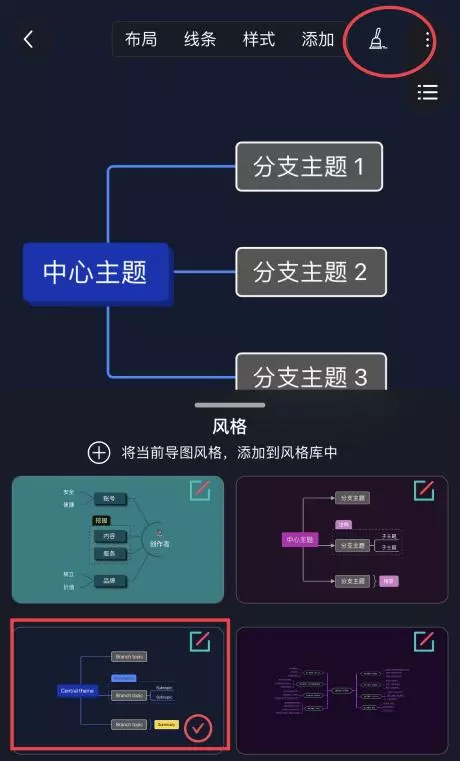
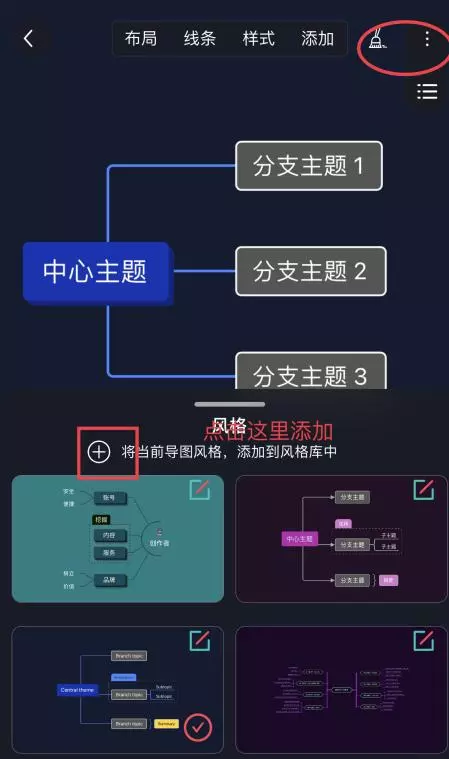
Click the brush button in the upper right corner and select your favorite style from the styles that appear, then you can switch styles, or you can create your own favorite style. Click the+button in the style to add your own style, then directly reference it next time, as shown in the picture
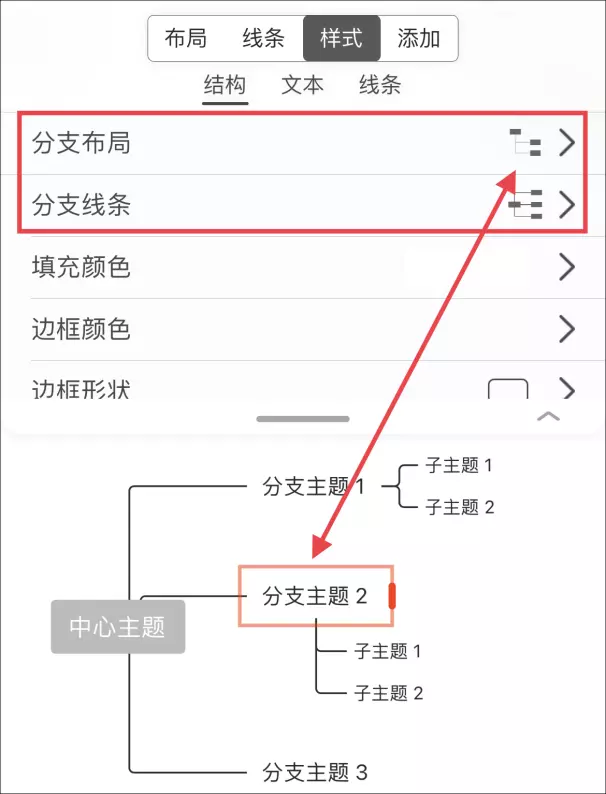
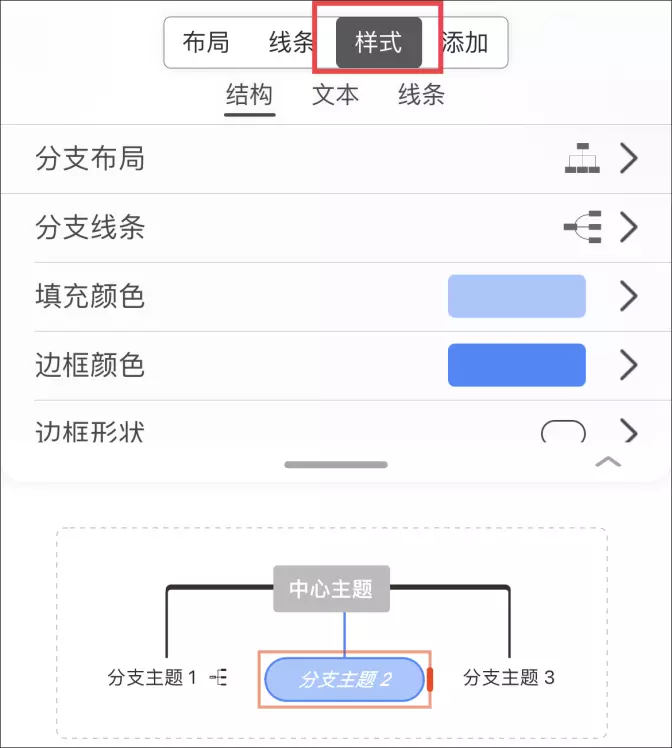
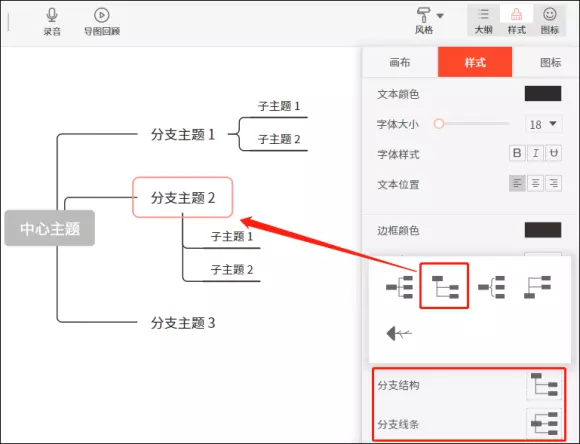
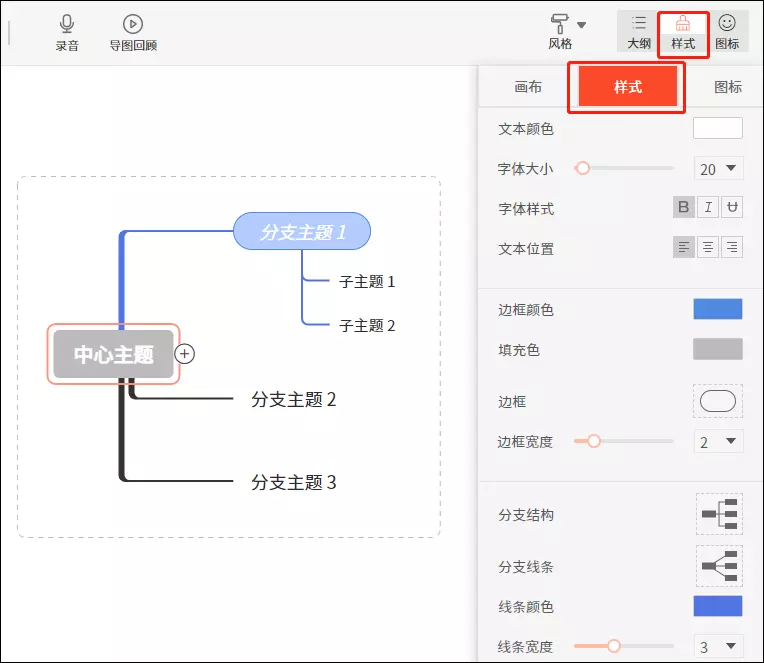
Click on the sub-node that needs to be changed, click on the style on the top menu bar, click on the structure, click on the branch structure, select the appropriate structure, click on the branch line, and select the appropriate line, as shown in the image:
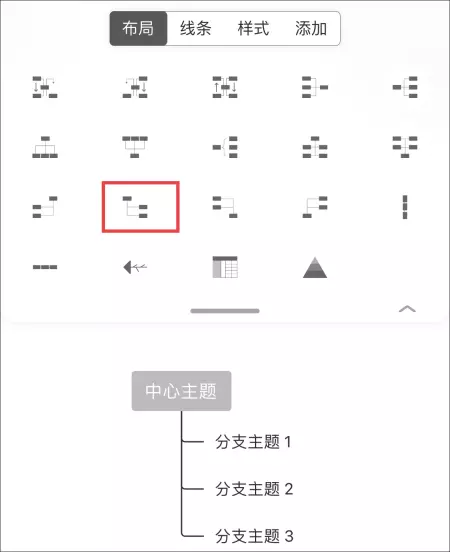
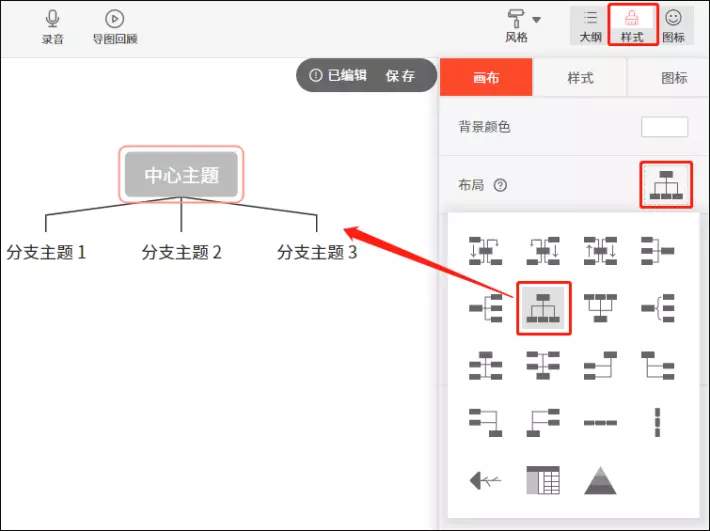
Just click on the top menu bar, select the layout, and select the appropriate click, as shown in the image:
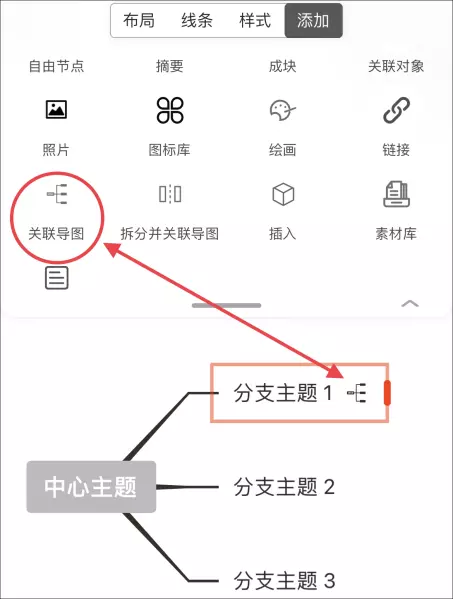
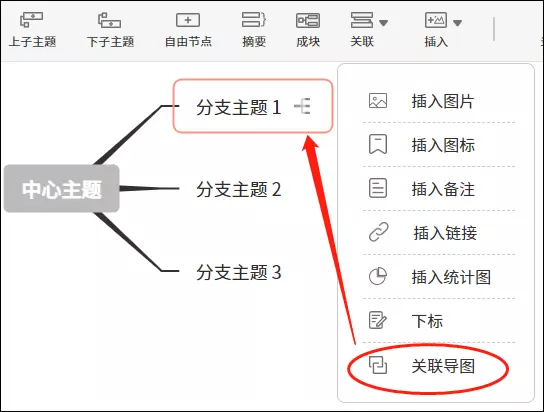
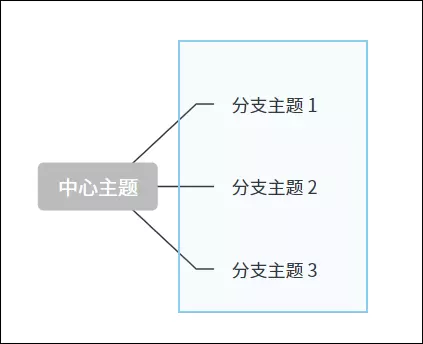
Select the node you want to link, click Add in the top menu bar, select the associated map, and select the map you want to link from the recently created/archived one, then you can link it, as shown below:
[1] On the Mind+ page, click the red+ button in the lower right corner, select the map type, and create;
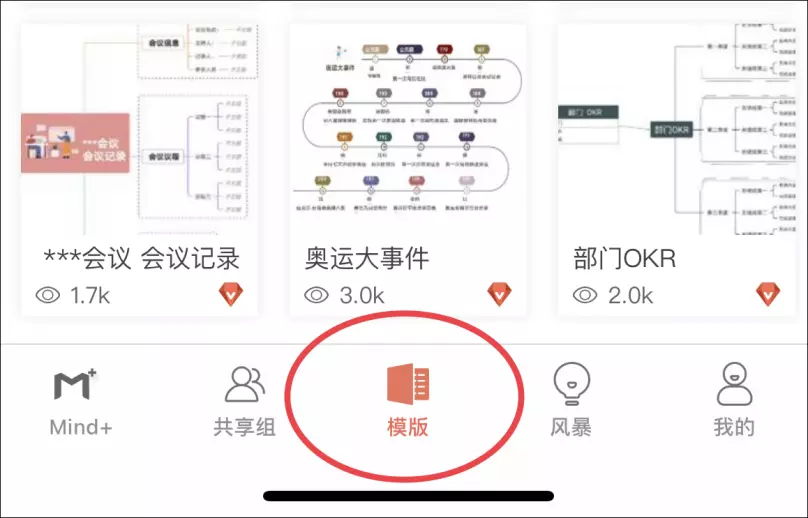
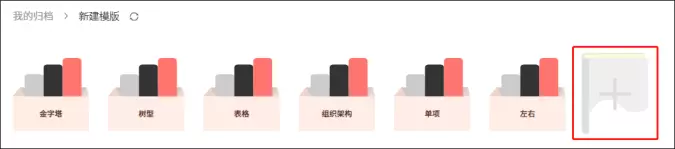
[2] Member users can also directly click on the template page, select the template they like, and click on the upper right corner to use the template to create it, as shown in the image:
Click the three dots in the top right corner to save and share.
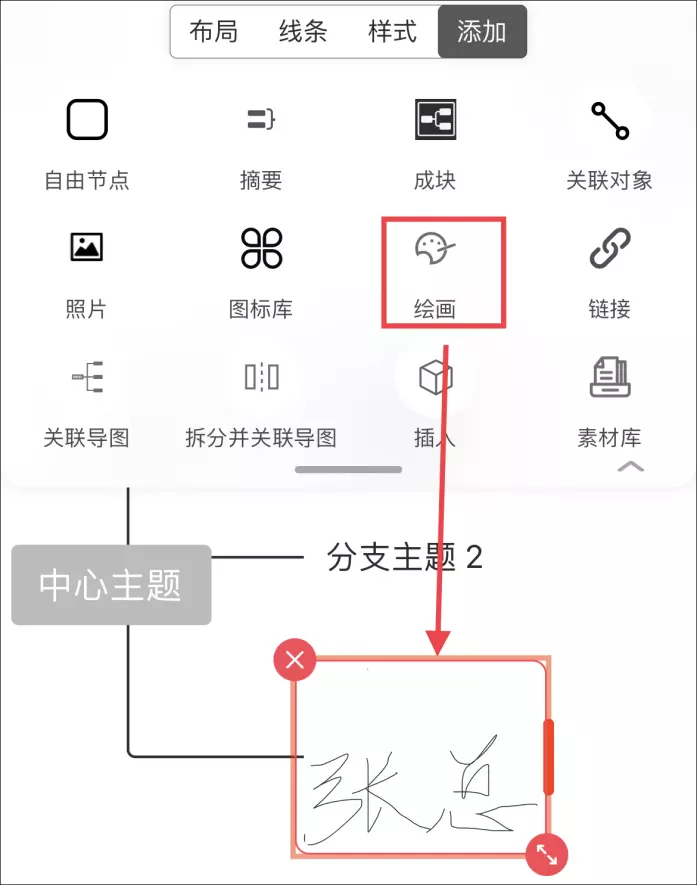
Click Add in the top menu bar, click Paint, just handwrite, and adjust the handwriting size, as shown in the image:
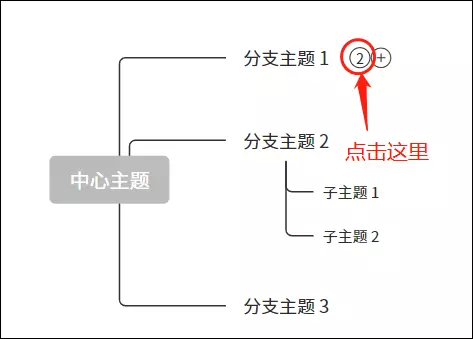
Click the eye in front of the node to hide the child node behind that node, as shown in the image:

Click the number after the hidden node (this number corresponds to the number of hidden nodes) to display the hidden child nodes, as shown in the image:
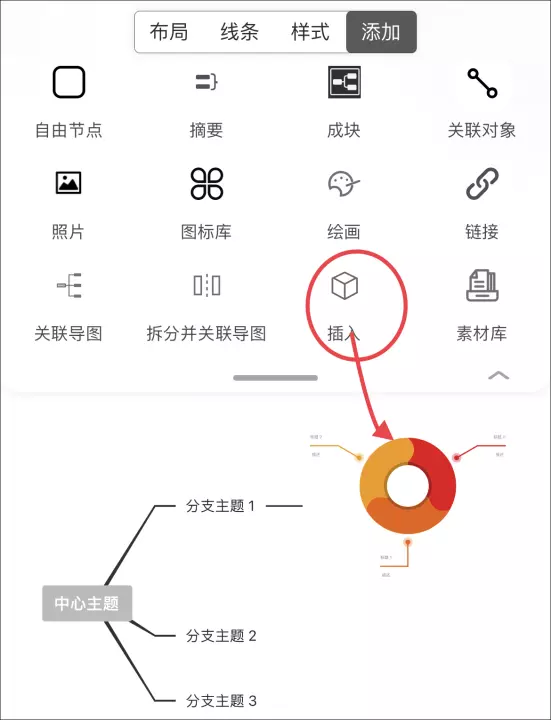
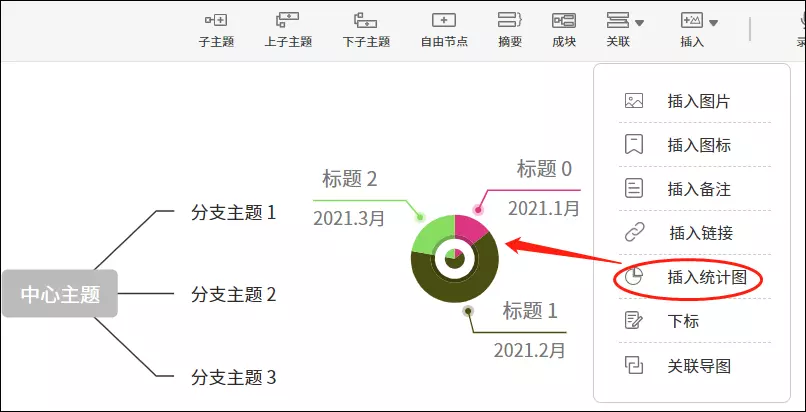
Select the node you want to insert, click Add, click Insert, select the chart type, double-click the blank area, click the right button on the chart, and click Edit to edit the chart, modify the color scheme, etc. As shown in the picture:
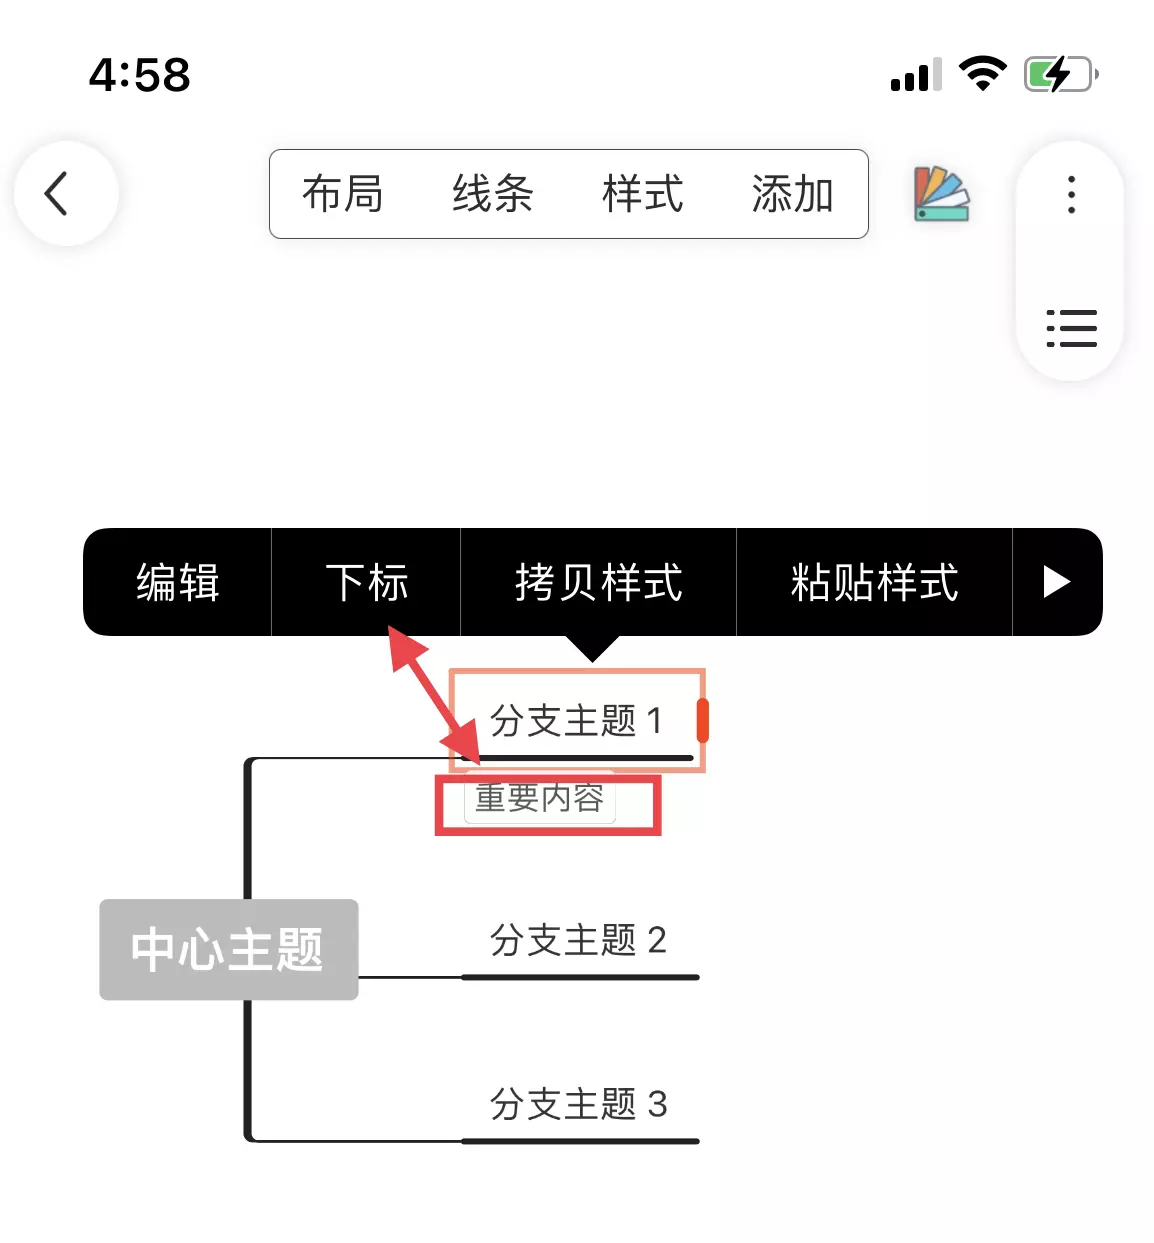
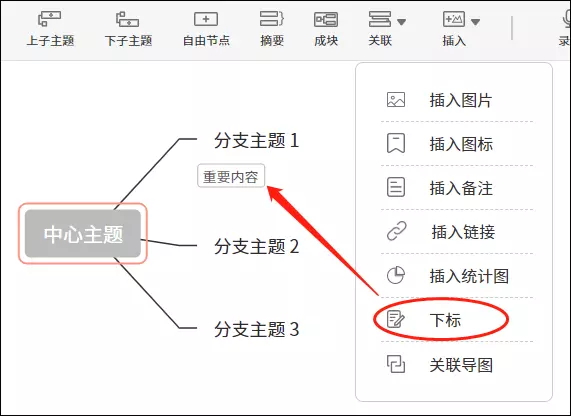
Select the node you want to insert, the shortcut menu appears, select Subscript, and enter the subscript content.
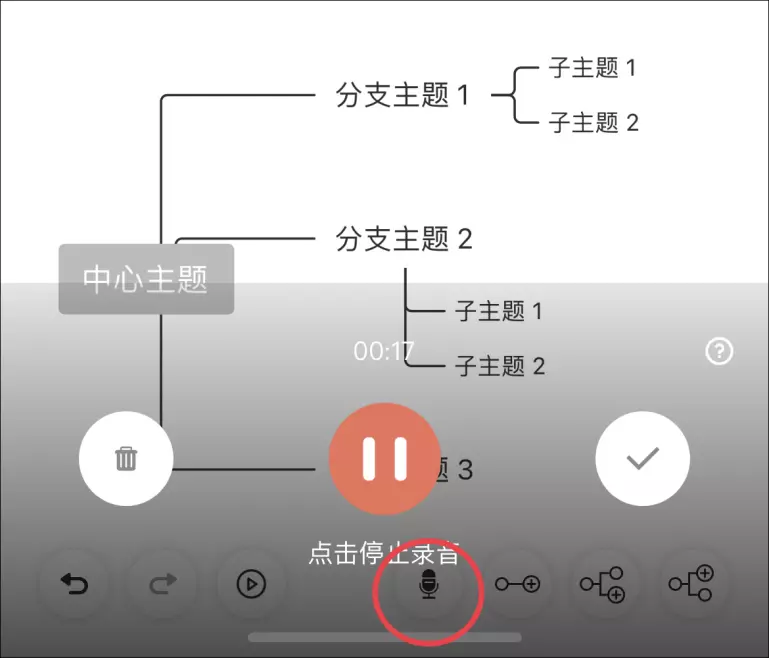
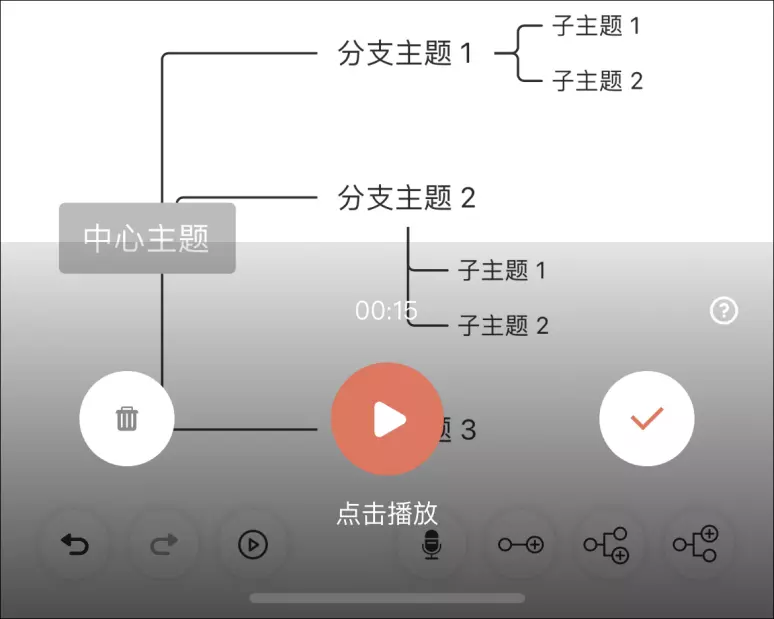
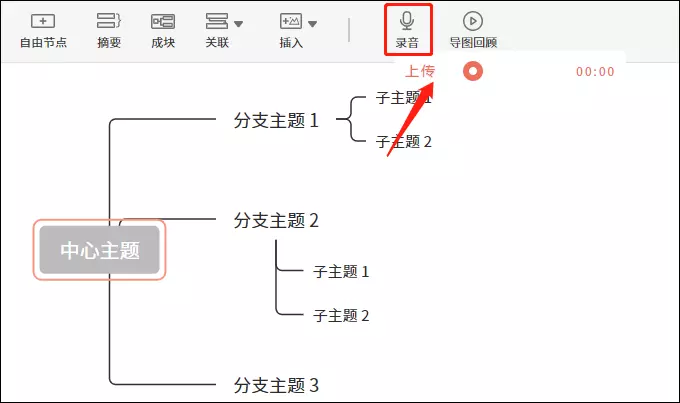
Click the recording button at the bottom. After recording, you can click Play to audition, then delete and re-record. After recording, click Confirm. At the bottom left of the top menu bar, click the play button to play, as shown in the image:
Long press on the center node of the map. After the auxiliary line appears, just drag it to the desired position.
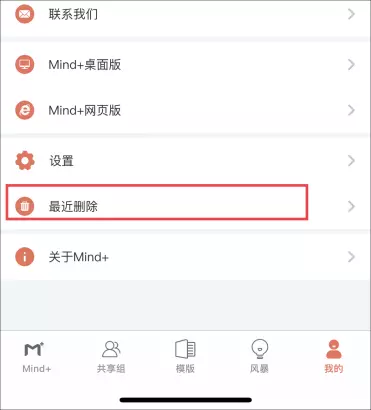
Find the recently deleted one in My, click Edit, select the document you want to reply to, and click Restore to find the map you want to restore in your recent creations.
In the upper left corner of the node you want to select more than one, press and drag to the desired position. That is, select multiple nodes, then modify the settings of the multiple nodes.
Select part of the text in the node, click Style in the top menu bar, select the text, and set the text, as shown in the image:
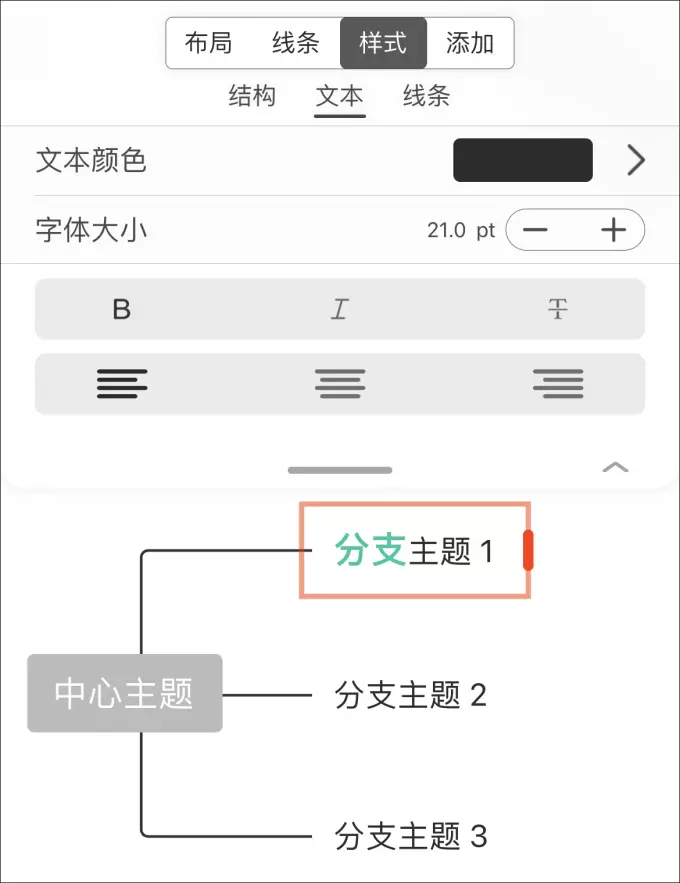
Select the node, click on the top menu bar style, and set the text fill color border, line, text, structure, etc., as shown in the image
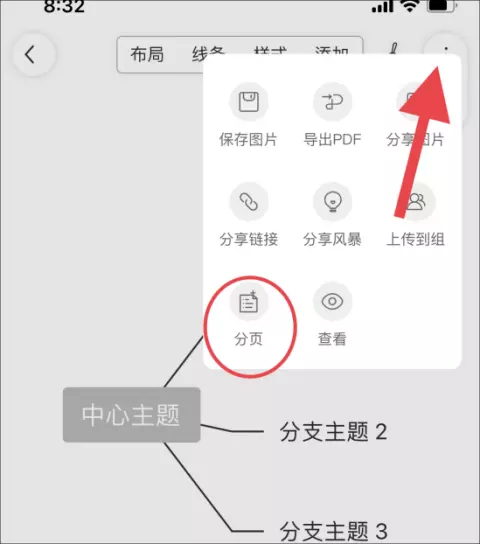
Click the three dots in the upper right corner, select pagination, and create a submap.
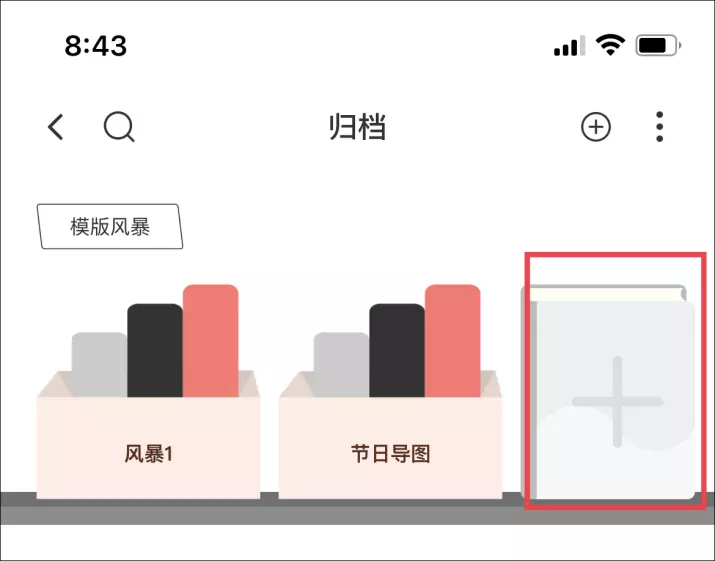
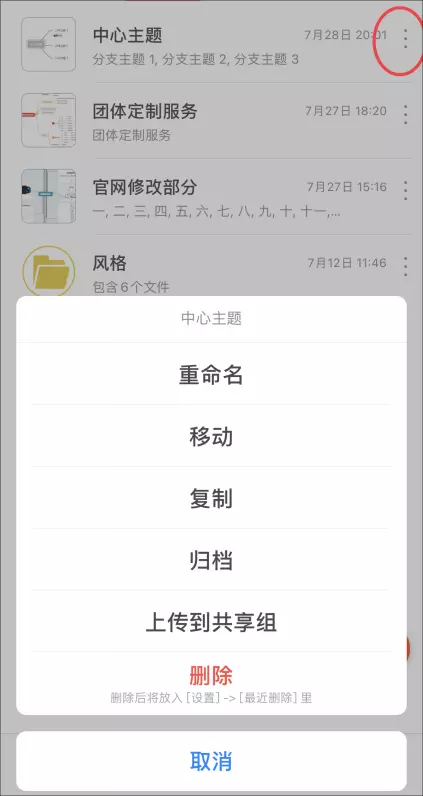
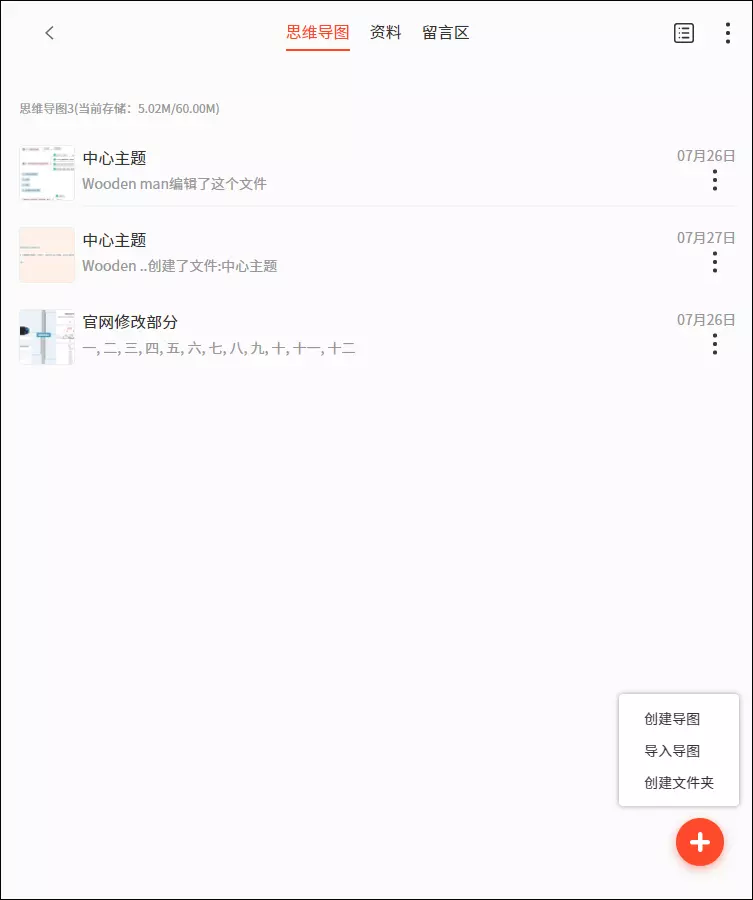
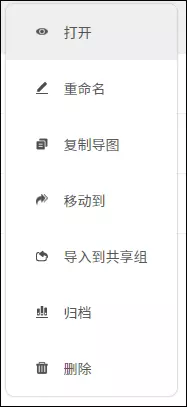
Archive: For maps that are not commonly used that have already been completed, move from recent creations to archives, sort and store them on the bookshelf. You can click on the three points on the far right of the document and select Archive, or go directly to the archive, click the plus sign, and select Import Map.
In the lower left corner of the edit page, click the undo button to undo the operation, and click the restore button on the right to resume the revocation.
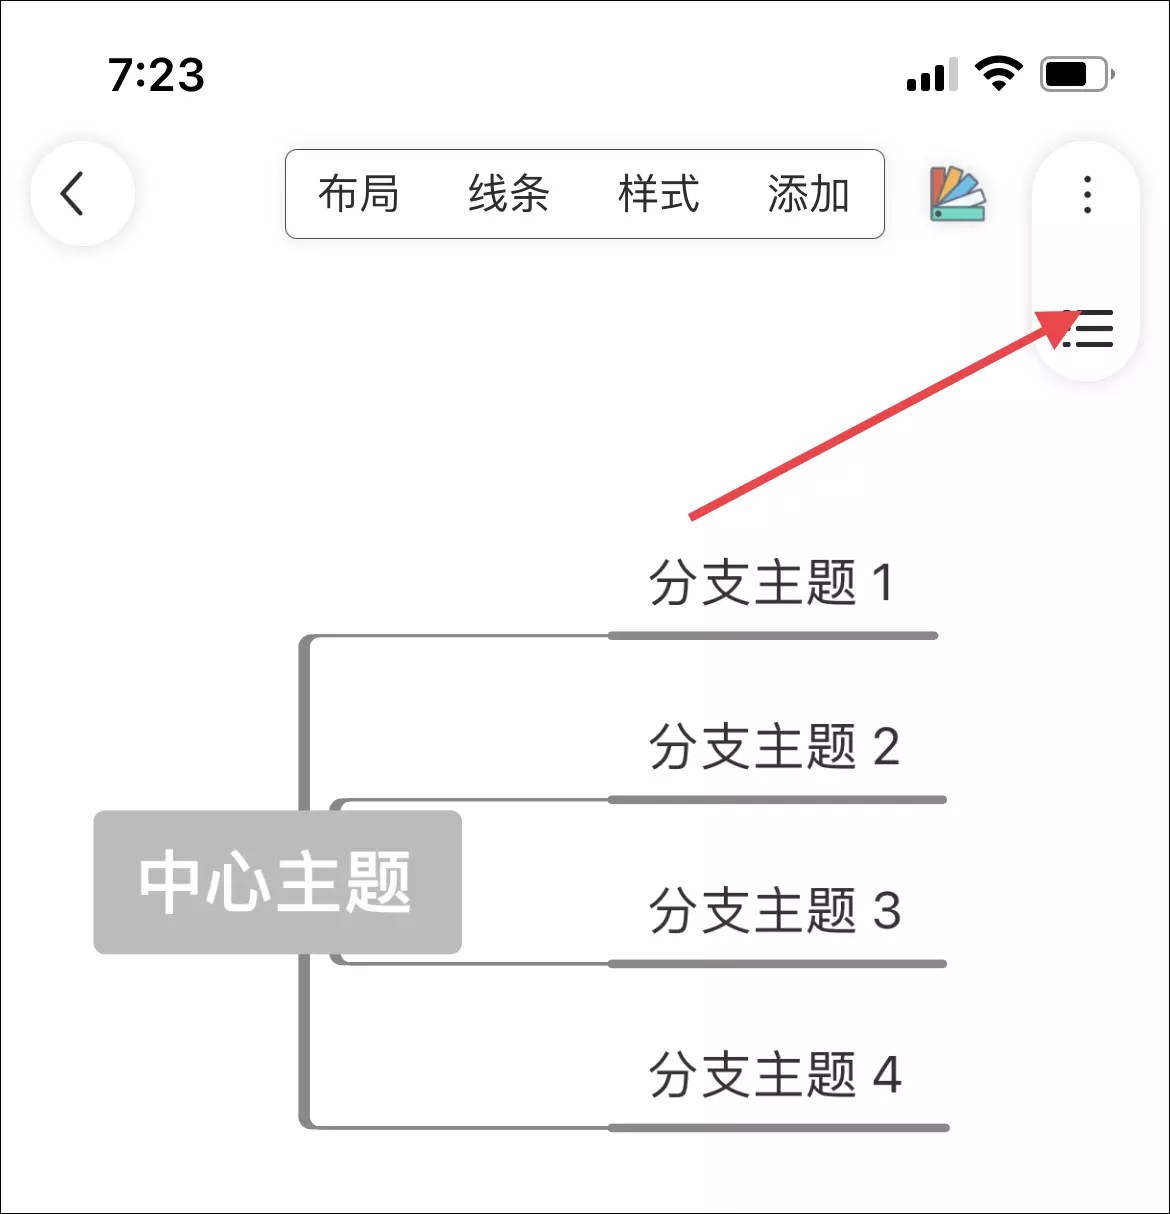
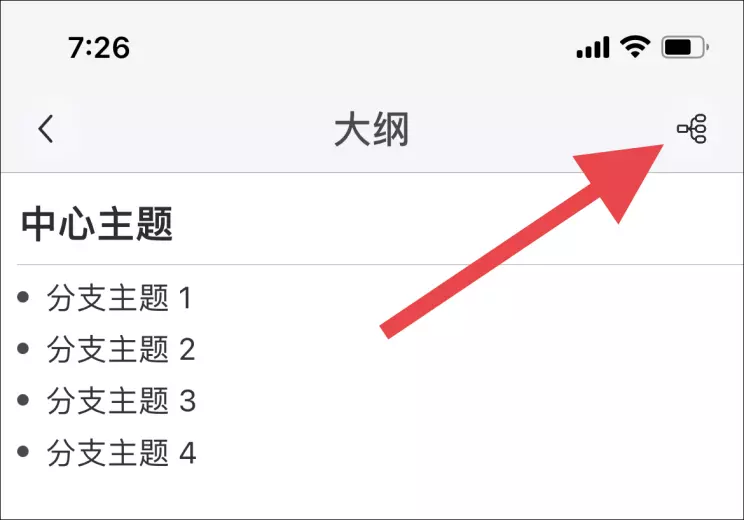
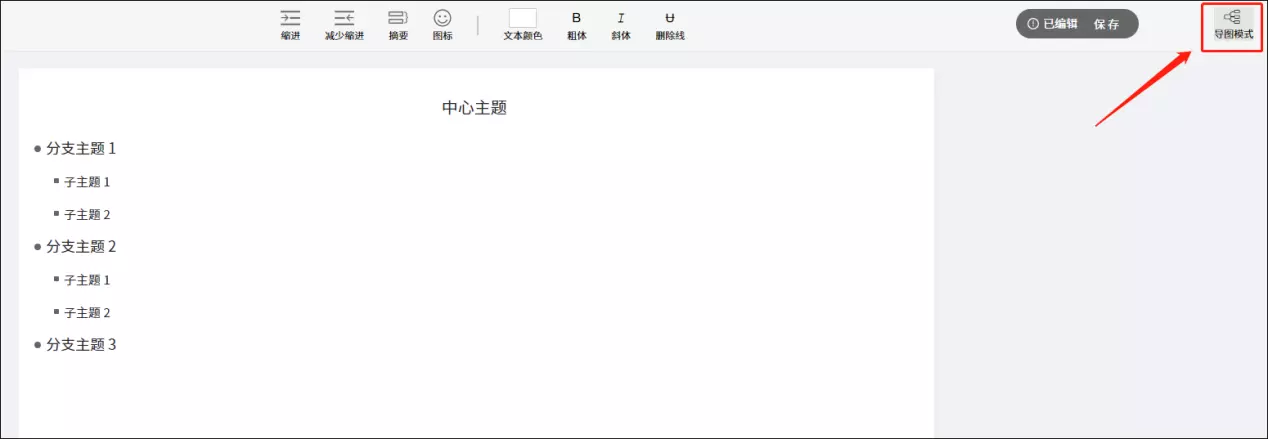
Click the horizontal bar button with the top point to enter outline mode editing, then click the map button with the top map to return to the stolen image mode, as shown in the image:
Enter outline mode:
Enter map mode:
The first step is shown in the image:
Second step
Click the three points on the far right of the document to open, rename, copy, move, import shared groups, archive, delete, etc.;
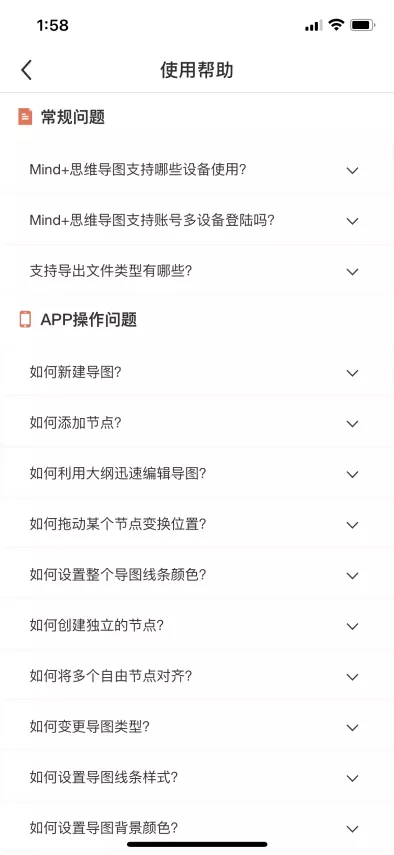
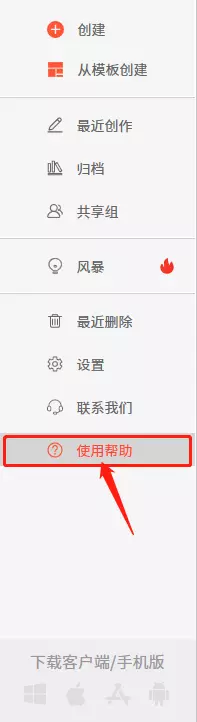
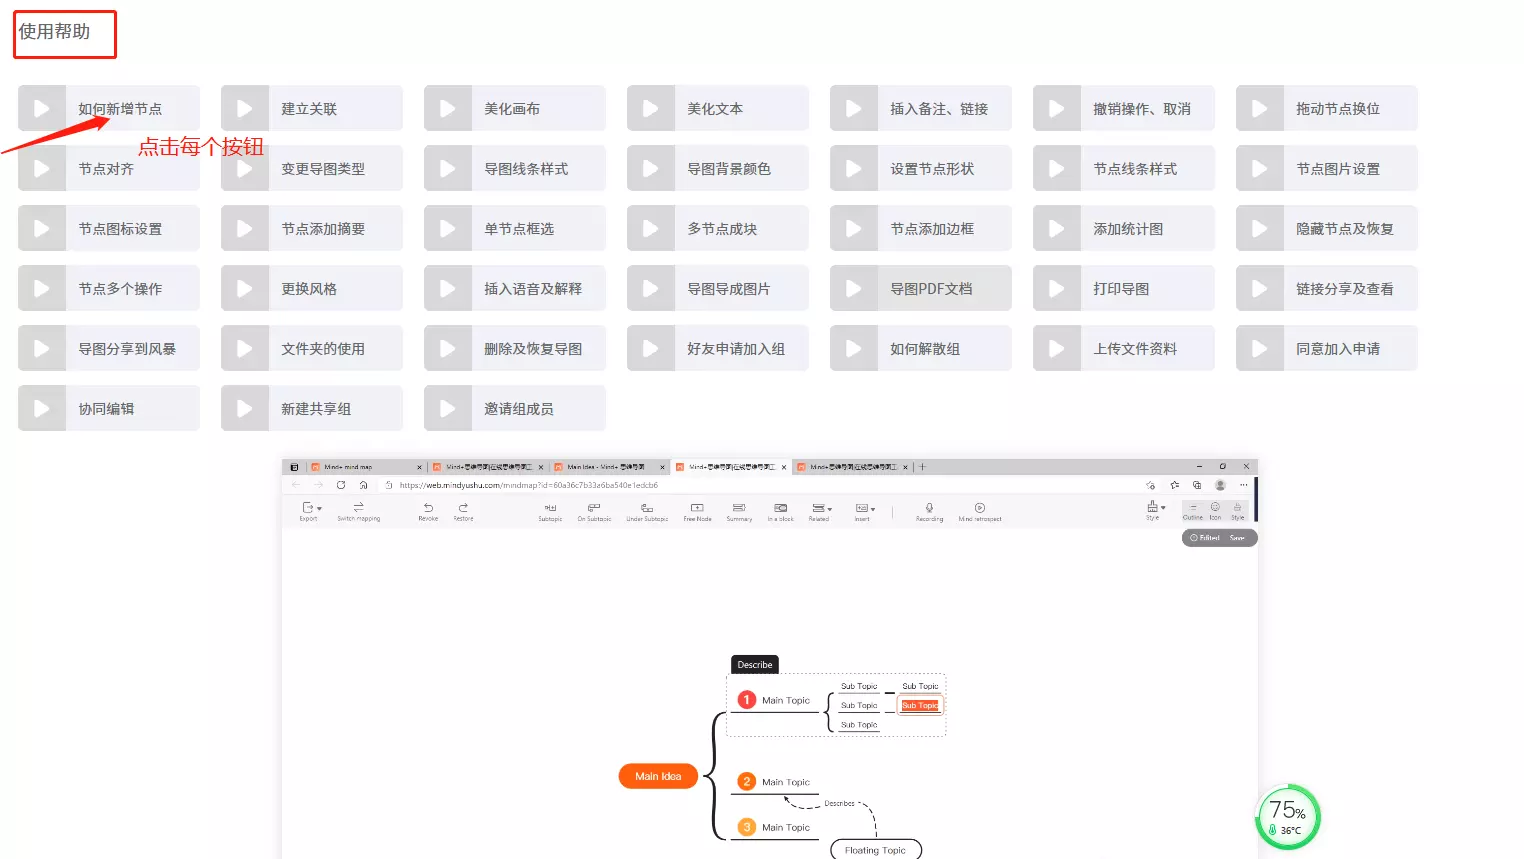
On my page, click User Help to view it, as shown in the image:
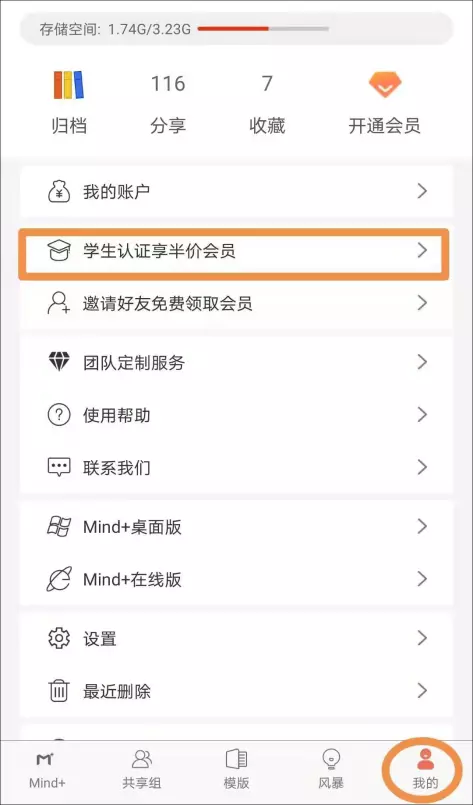
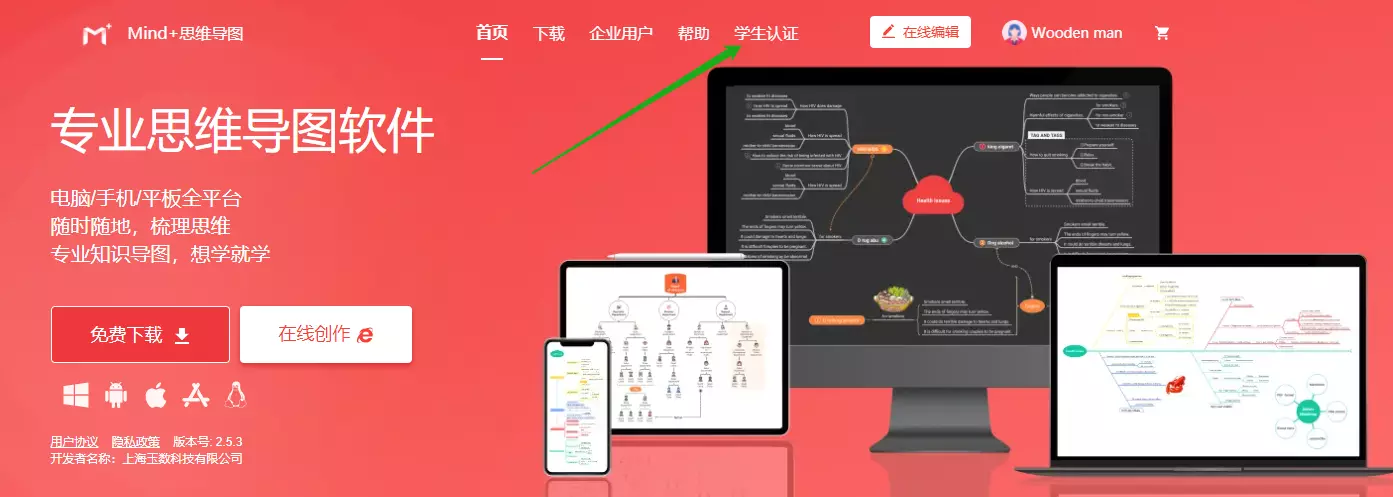
Step 1: Click My Page, click Student Certification to enjoy a half-price membership,
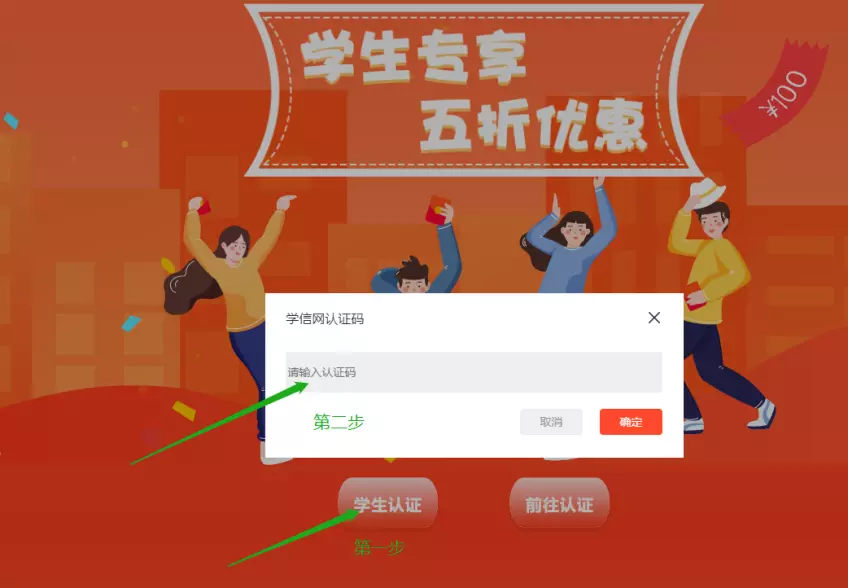
Step 2: Go to the certification page and click to go to the certification, as shown in the picture:
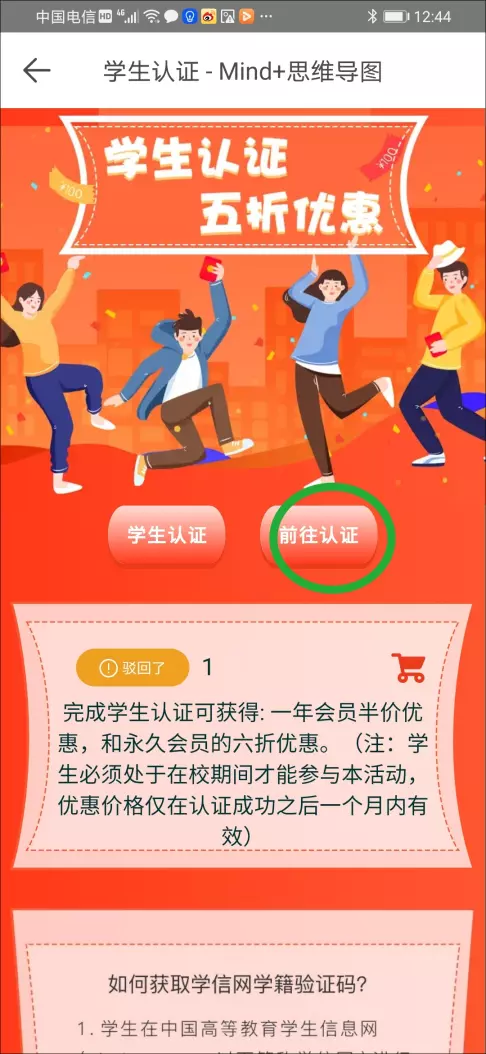
Step 3: After certification, obtain the Xuexin.com authentication code, save it, return to the verification page, click Student Certification, enter the authentication code, and certify, as shown in the picture:

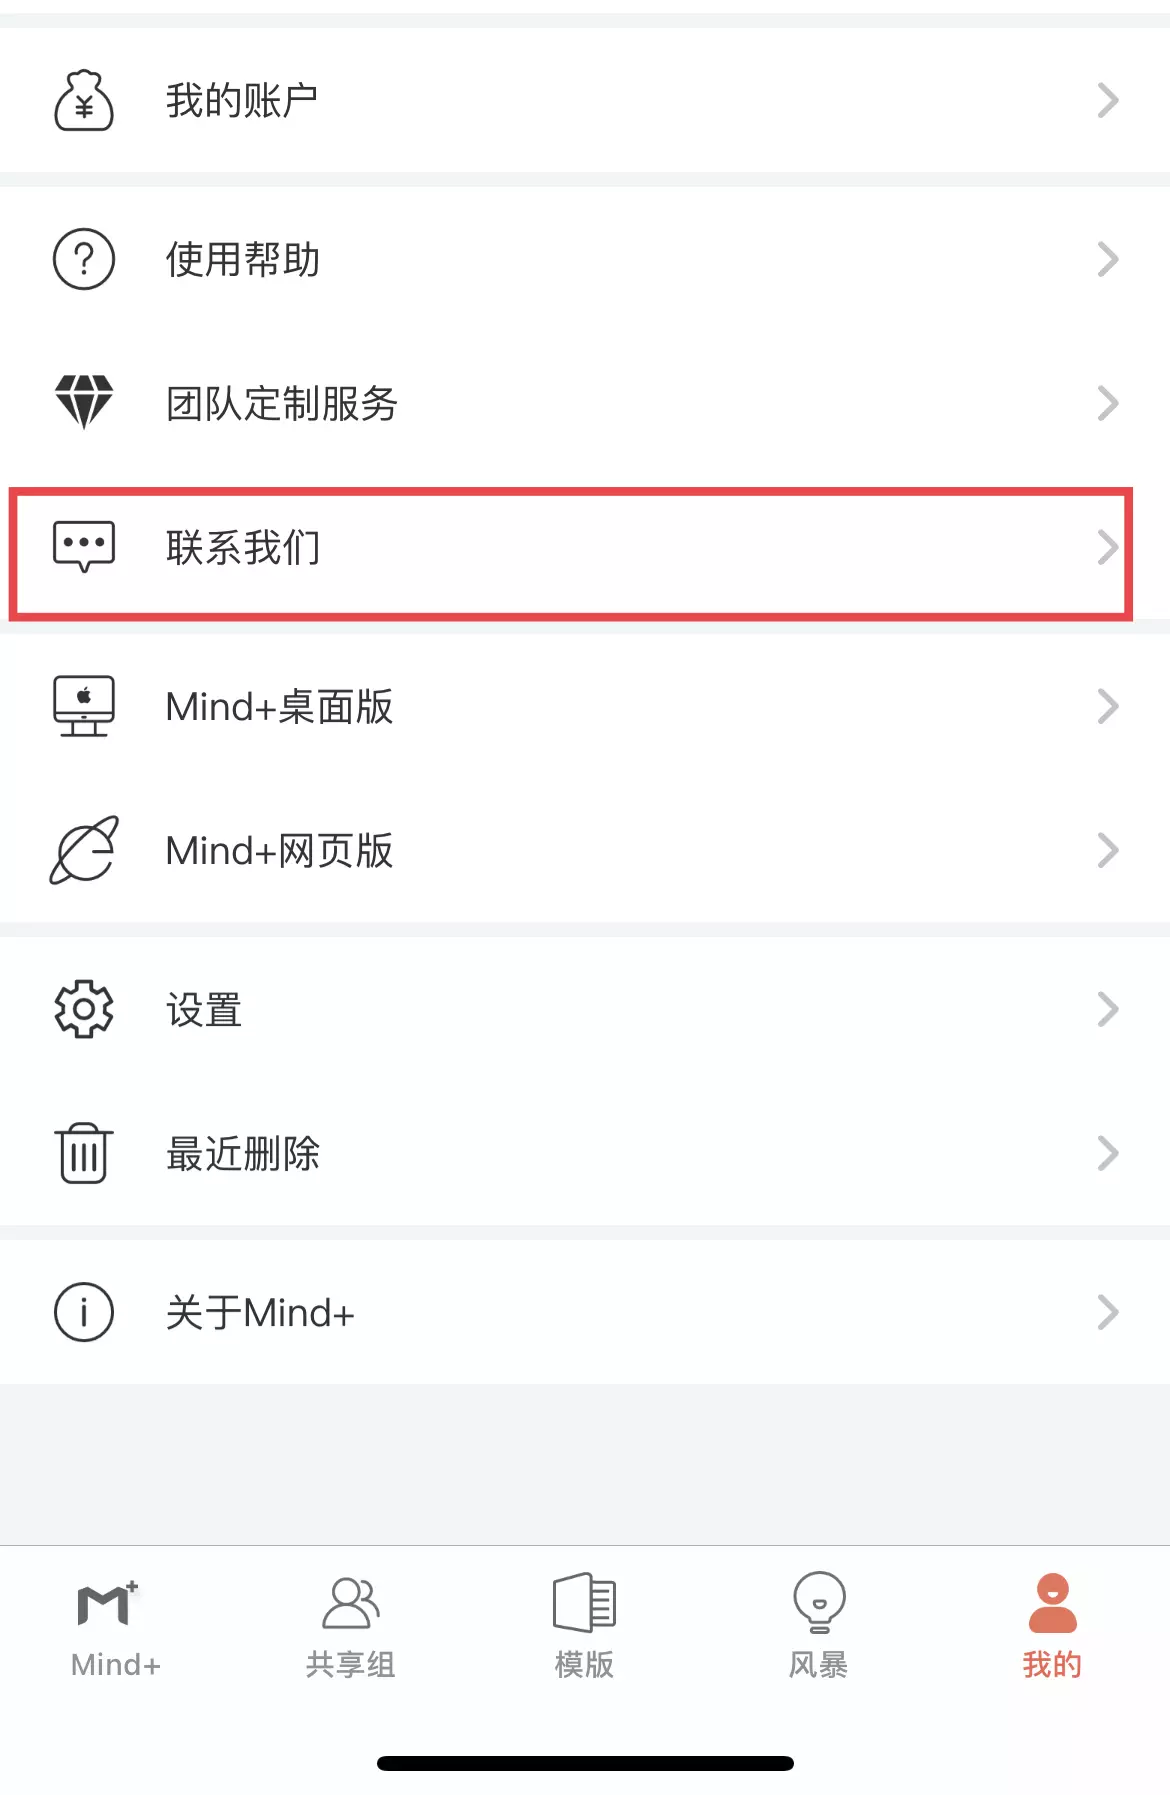
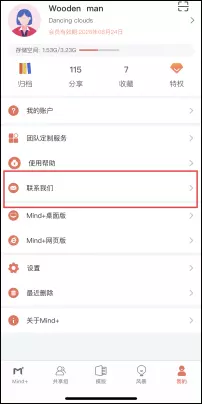
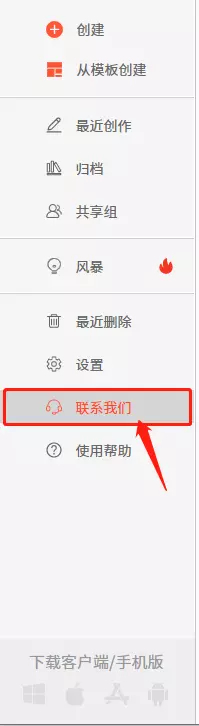
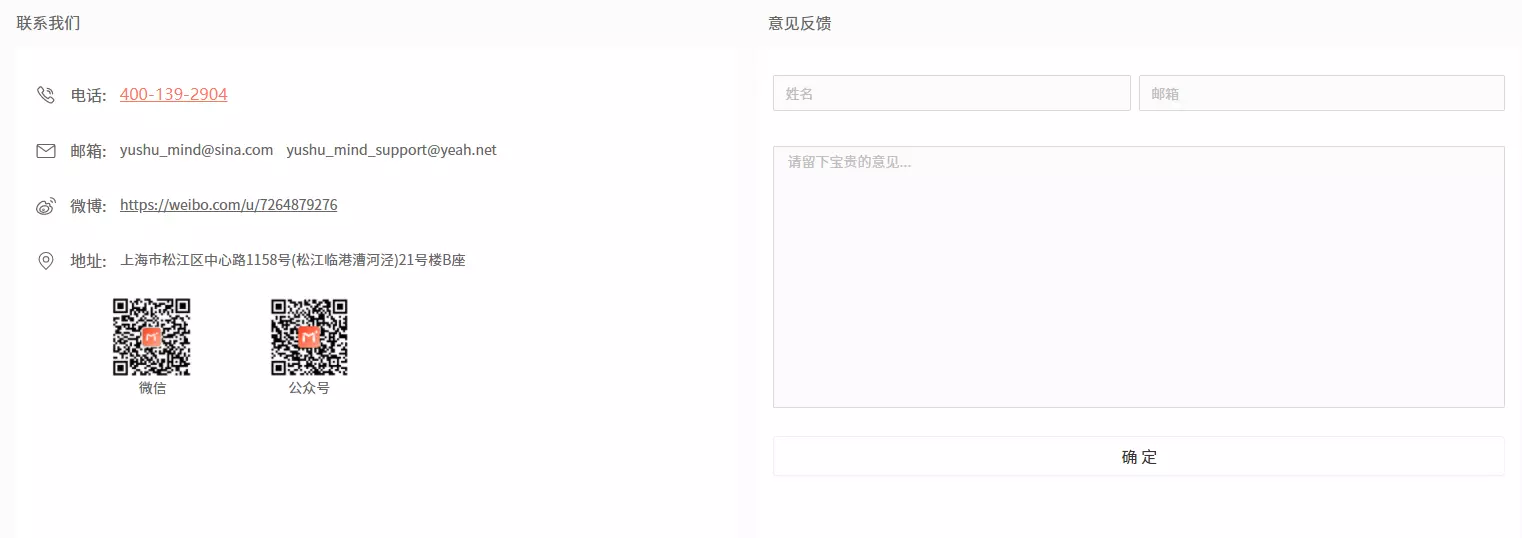
On my page, click Contact Us to send an email with feedback, as shown in the image:
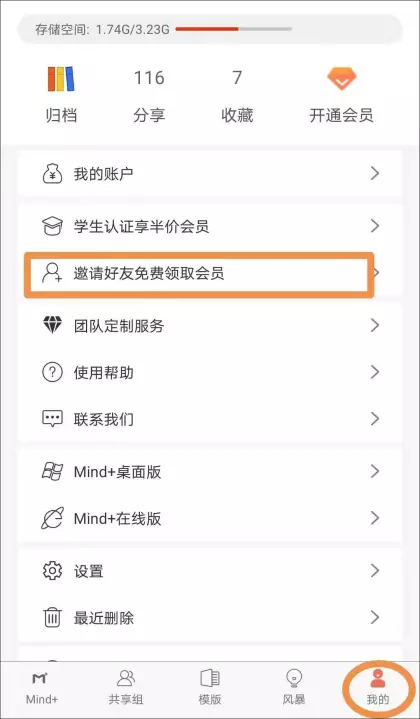
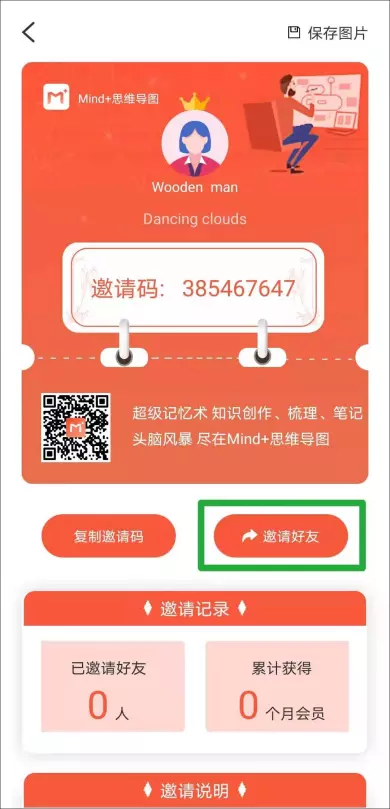
Click on My Page, click Invite a Friend to receive a free membership, send an invitation code to your friend via WeChat/QQ, etc., and invite 5 friends to get a 1-month membership, as shown in the picture:
First step:
Second step:
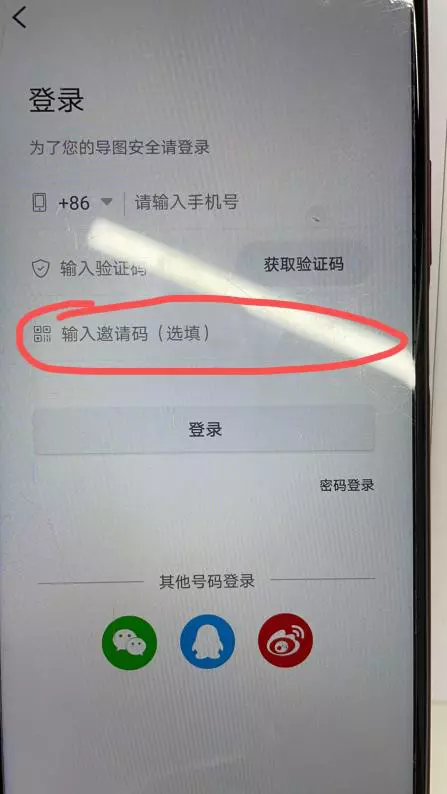
A friend downloads the app (Android phone), and when logging in and registering, click to enter the invitation code and enter the invitation code in the input box. Your friend can enjoy a 10% discount when purchasing a membership, as shown in the picture:
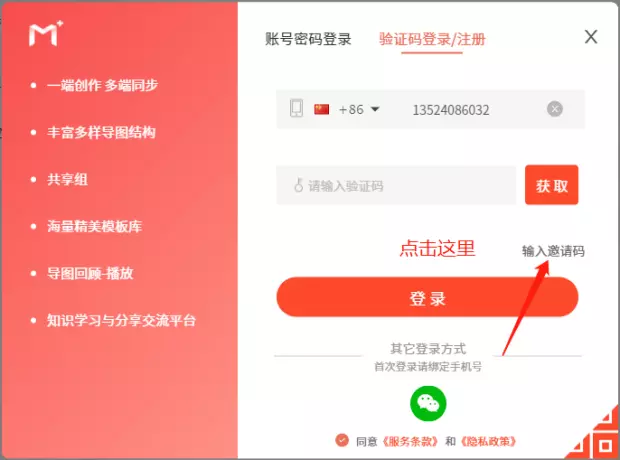
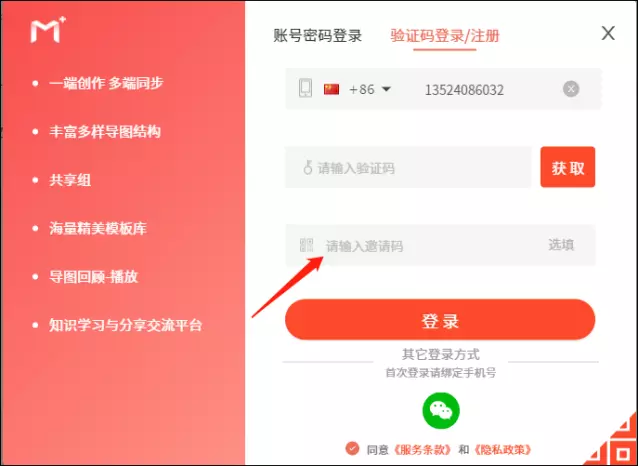
Friends log in to the web version or download the PC version. When logging in and registering, click to enter the invitation code and enter the invitation code in the input box. Friends can enjoy a 10% discount when purchasing a membership, as shown in the picture:
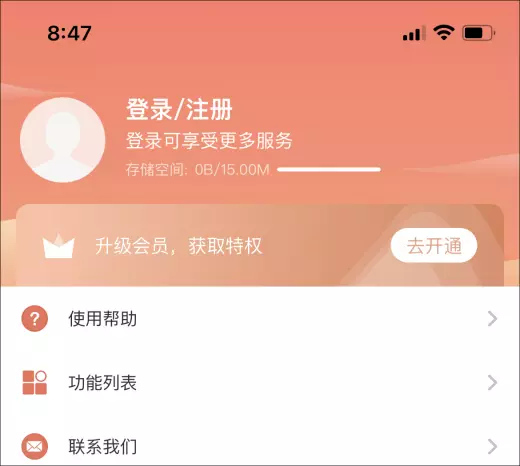
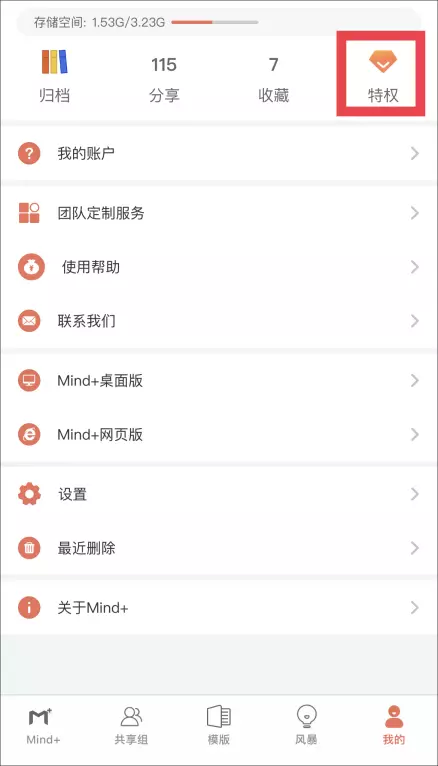
On my page, click Privileges, as shown in the image:
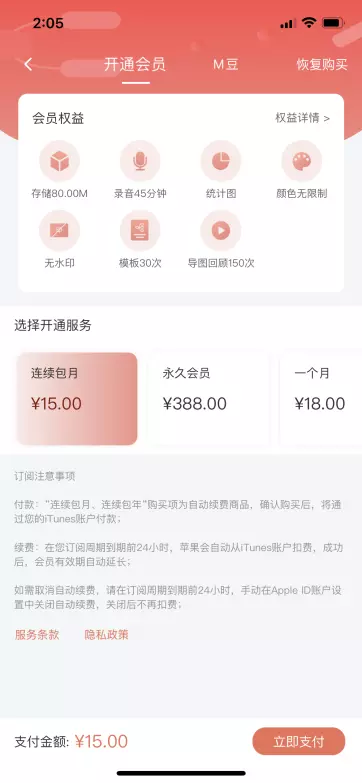
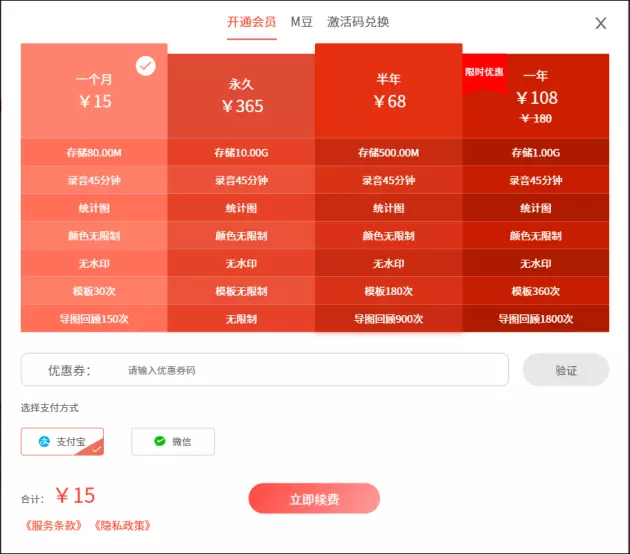
Just select the type of membership you want to activate and pay to activate, as shown in the picture:
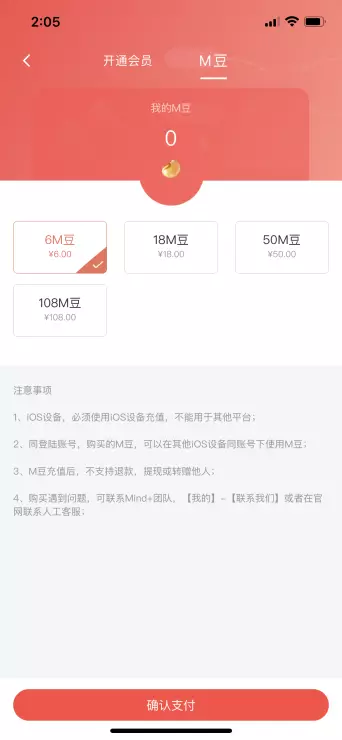
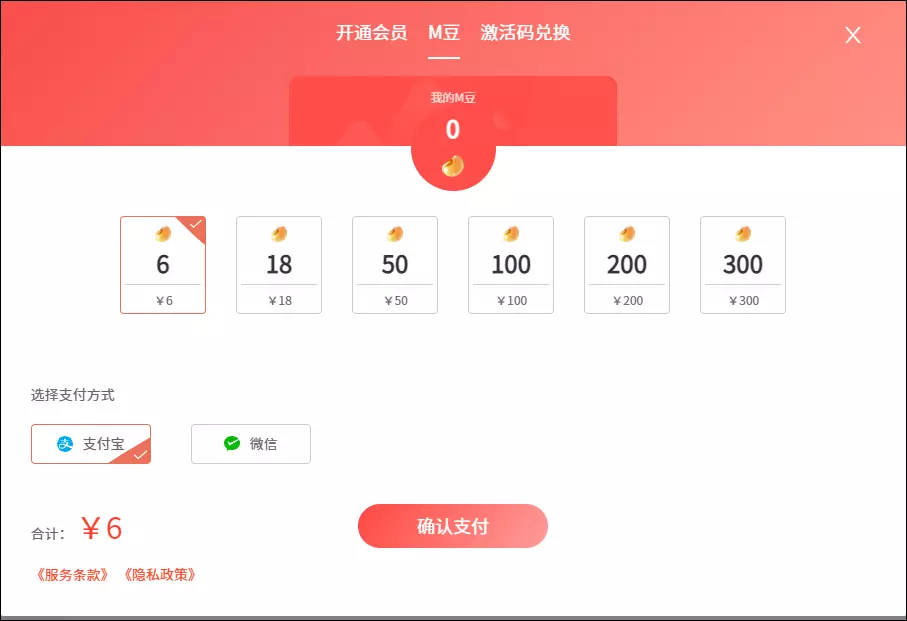
Buy M Beans: Can be used to upgrade the number of shared group members, upgrade storage space, use Pay Storm, join paid public groups, etc.
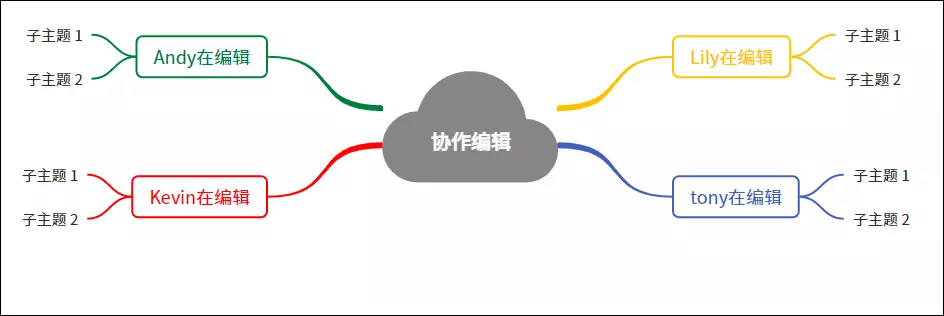
The same map can be edited by multiple people in real time
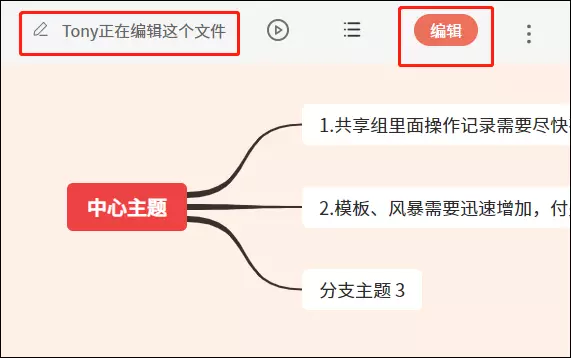
Click the area on the right side of the group avatar to enter the document page, as shown in the image:
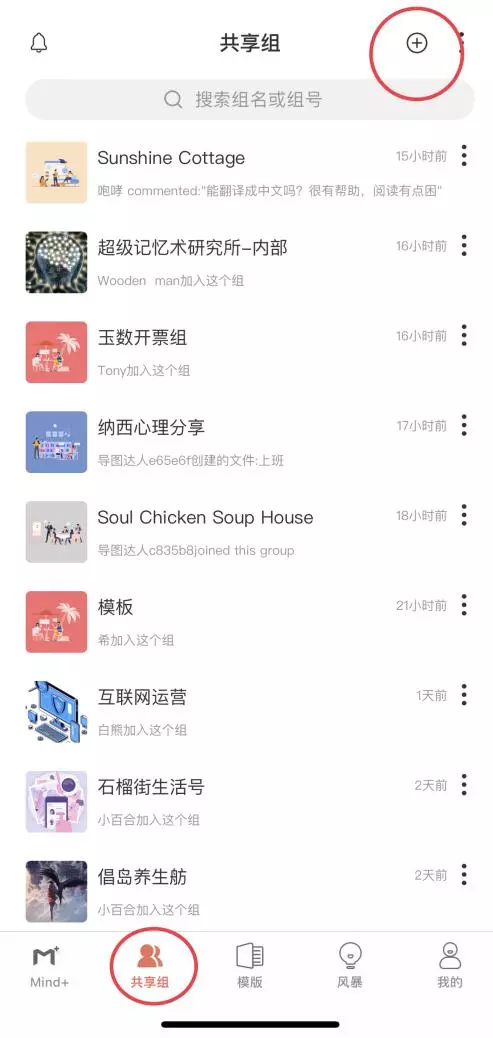
On the sharing group page, click the plus button in the upper right corner to enter the creation page, as shown in the image:
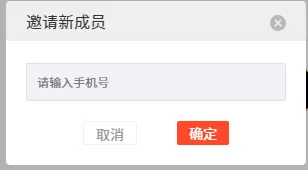
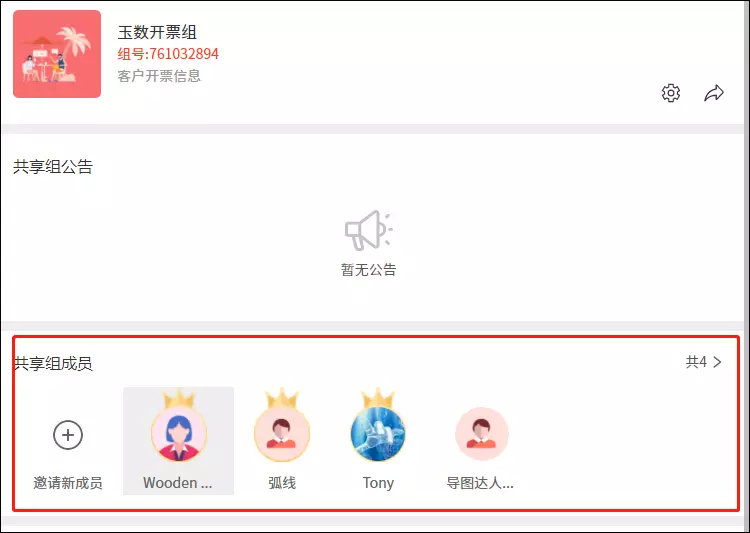
Method 1: Click on the group profile picture, go to the group information page, click the + button on the shared group member, invite new members, enter the friend's mobile phone number, and click the button on the shared group page to agree to join.
Friends download the software, log in to their account, and click the button in the upper right corner of the sharing group column on the left side of the sharing group page to agree to join;

On the details page of the sharing group, you can check whether you have successfully joined.
Method 2: Click the group profile picture to enter the group information page, and click the share arrow button on the far right of the group profile picture, as shown in the image:
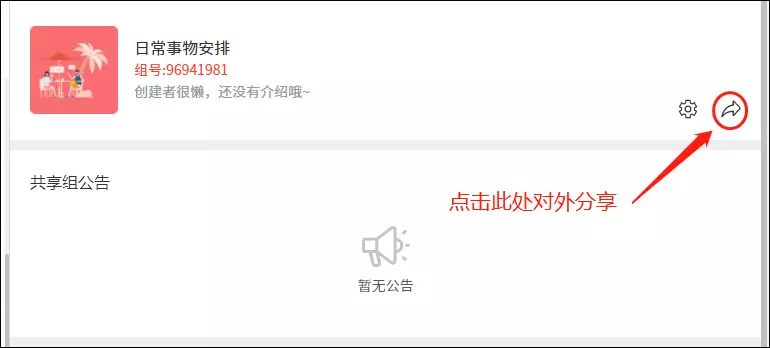
Save the group picture and share the picture with friends via WeChat/QQ, as shown in the picture:

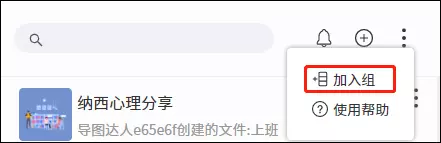
Method 3: Click the shared group, click the three-dot button next to the plus button, enter the group number to join, and the group manager clicks the button to agree to join. The new member has been successfully added. Go back to the group details page to check the status of the addition, as shown in the picture:
Documents shared by sharing groups have the characteristic of instant delivery, that is, all online users can view them, preventing the same document from being sent to multiple people multiple times.
Click the area on the right side of the group avatar to enter the document page, as shown in the image:

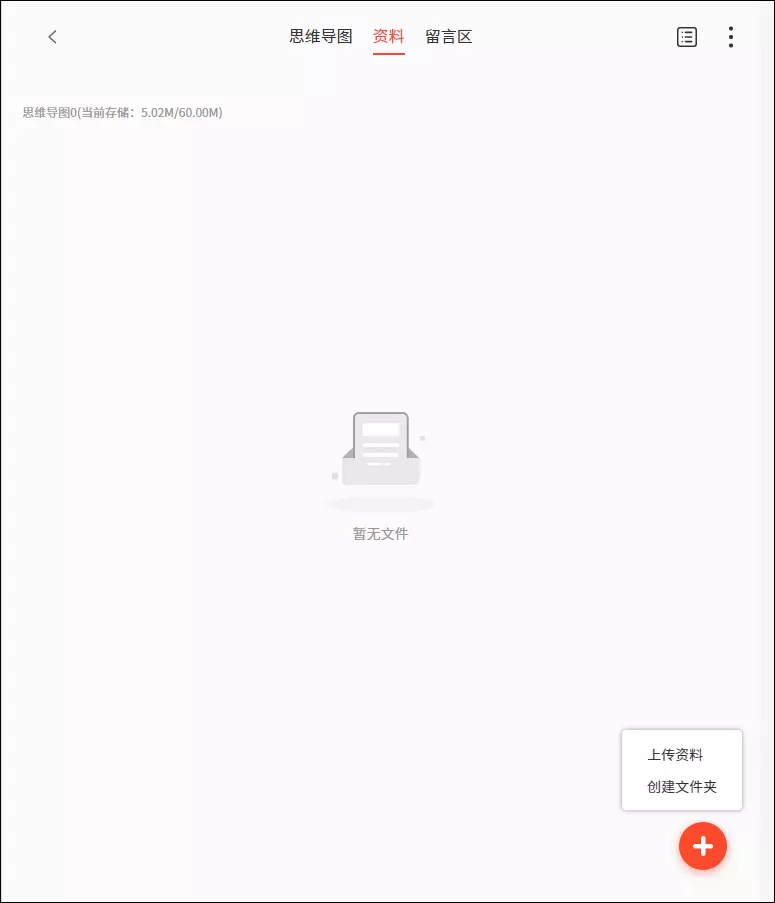
Click on the profile page to create a folder and upload data, as shown in the image:
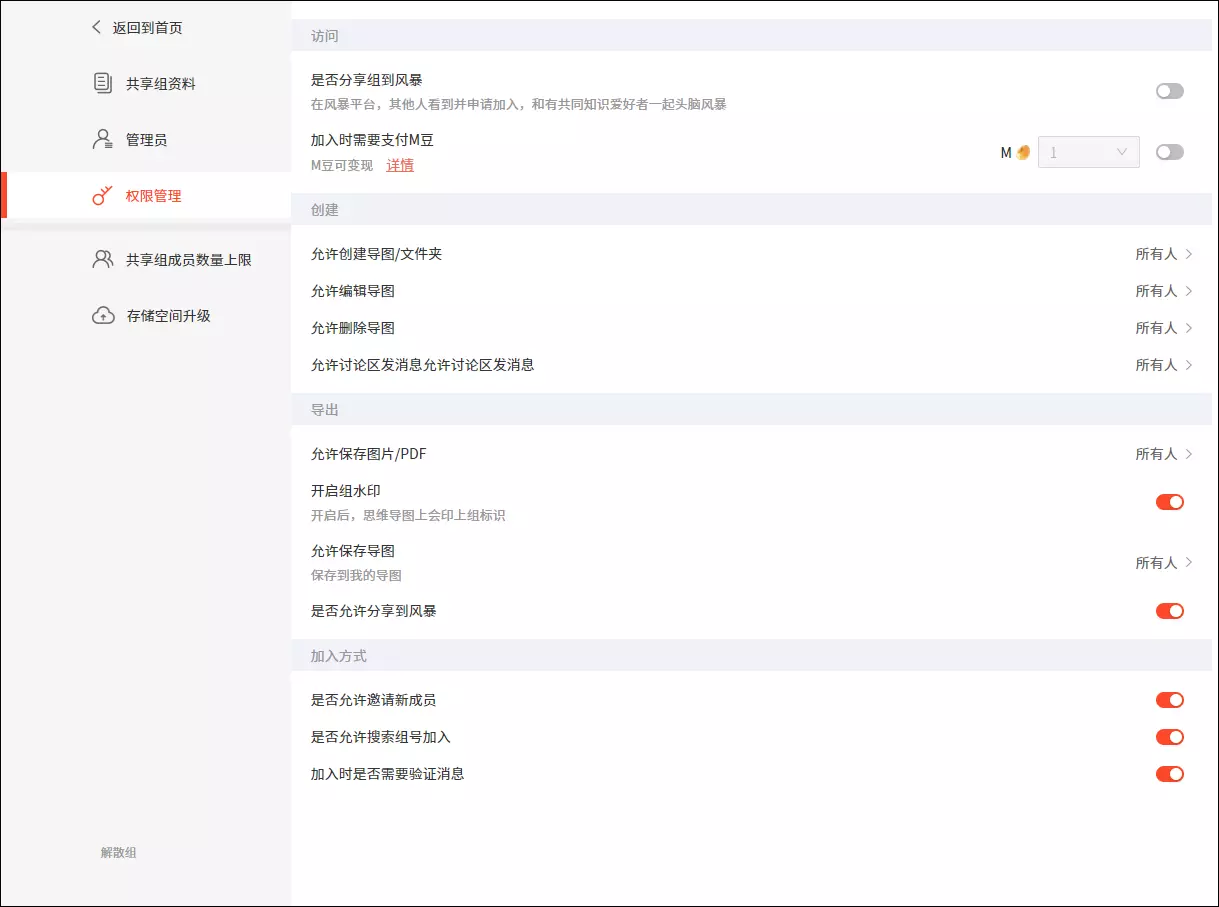
Click the group profile picture and click the settings button on the right side of the group profile picture to enter the settings page to set it up, as shown in the image:
Click the area on the right side of the group avatar to enter the document page, as shown in the image:

It is a group of people with the same learning interests and knowledge in similar fields to share maps, materials, and achieve knowledge sharing discussions.
The purpose of learning
You can set whether group members pay to join a cloud group when creating a group or on the group settings page after creating the group, as shown in the figure:
When joining a public group, users can join a free group or pay to join a group. As shown in the picture:
Users share their own map knowledge and show it to everyone. Viewers can like and comment on the map content to achieve the goal of sharing knowledge and promoting mutual learning.
On the edit page, click Share to Storm, make settings, and choose whether to earn M beans, etc., as shown in the picture:
Users can choose to use Storm content for free or for a fee, as shown in the picture:
Create a page, click the node you want to add, and then click the summary button at the top to add it, as shown in the image:
Add a summary to multiple nodes: After adding a summary to a single node, click the summary, drag the area box, and drag the required node position, as shown in the image:
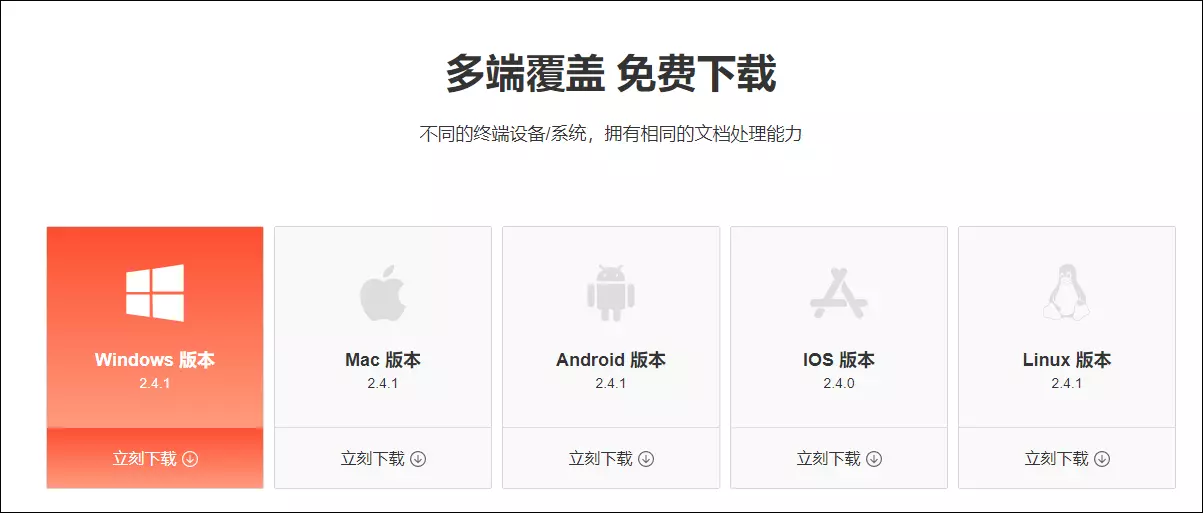
1. Log in to the official website: mindyushu.com and click directly on the homepage or download page to download the corresponding computer system as shown in the picture:
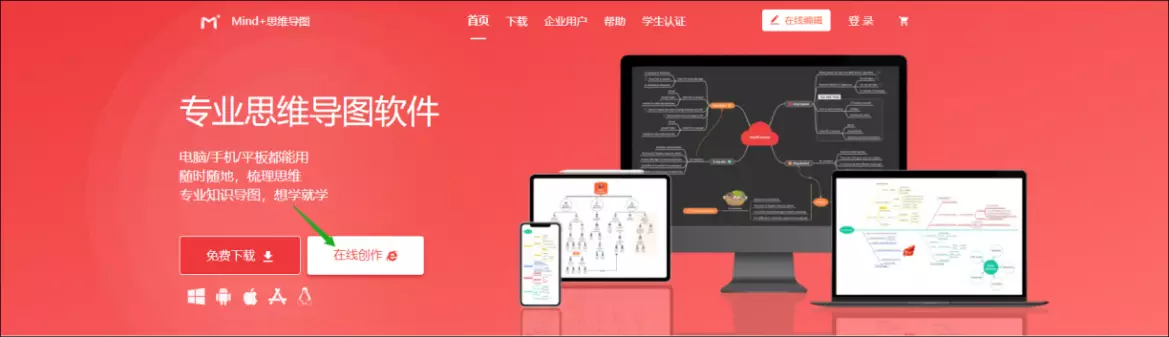
2. No download required: log on to the official website: mindyushu.com and directly [create online]
Click on the profile in the upper left corner to view personal information, personal account, and settings information.
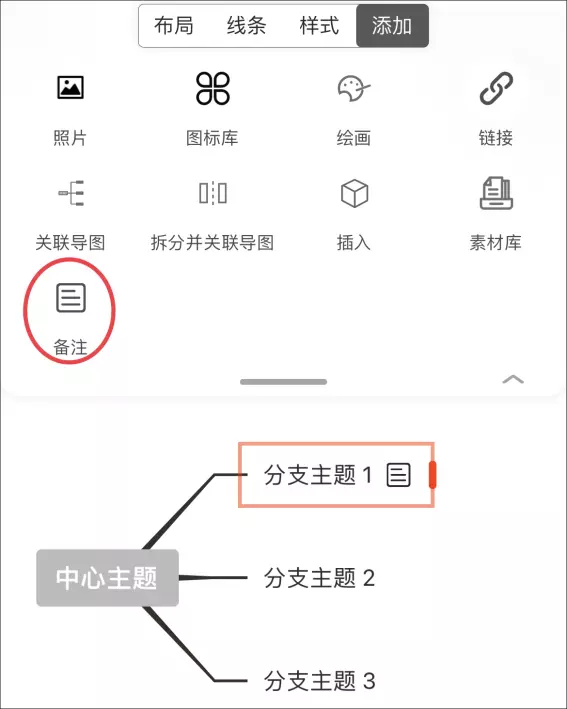
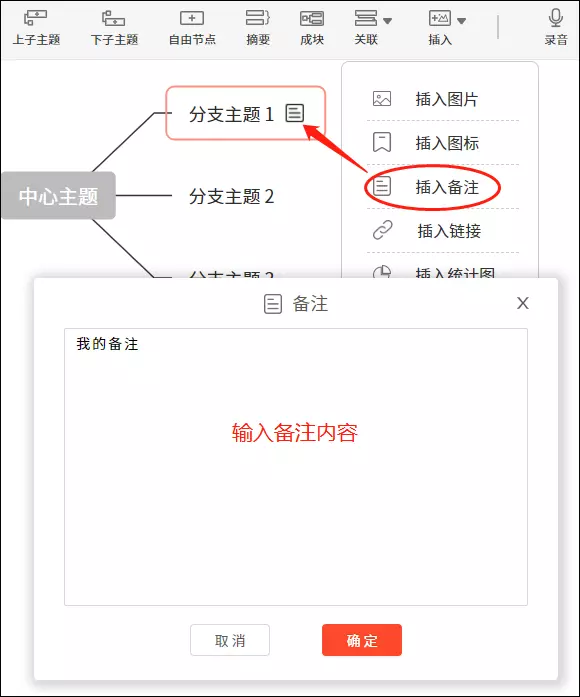
Click the node you want to add, click Insert in the top menu bar, select Insert Comment, enter the comment content in the comment input field, and confirm.
Method 1: You can also drag and drop the image from the desktop directly into the map and add it automatically.
Method 2: Click the node you want to add, click Add, click Comment, and enter the comment content.
Click the first node that needs to be linked, then click the link in the top menu bar to select the appropriate line style, then click the second node that needs to be associated, adjust the line position, and add descriptive text in the description, as shown in the image:
Click the style button on the far right at the top, select the canvas, and make settings, as shown in the image:
Click the sub-node that needs to be changed, click Style on the right side of the top menu bar, select the style, click the branch structure, select the appropriate structure, click the branch line, and select the appropriate line, as shown in the image:
Just click the style button on the right side of the top menu bar, select the canvas, click on the layout, and select the appropriate layout, as shown in the image:
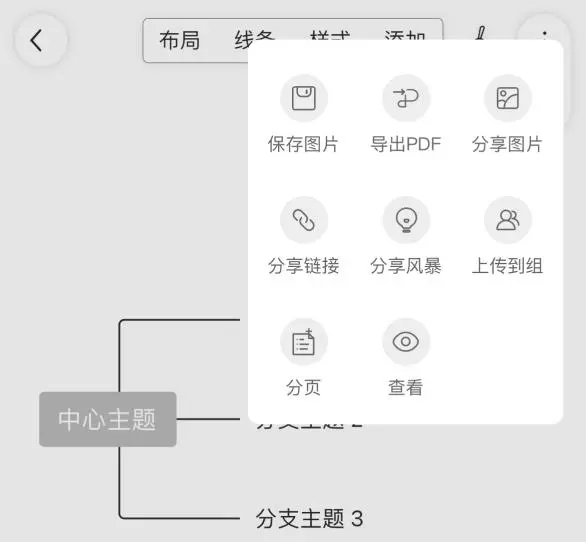
Click the export button on the leftmost side of the top menu bar, select Save Image, Save PDF, Share Link, Share to Storm, Print, and Upgrade your membership, as shown below:

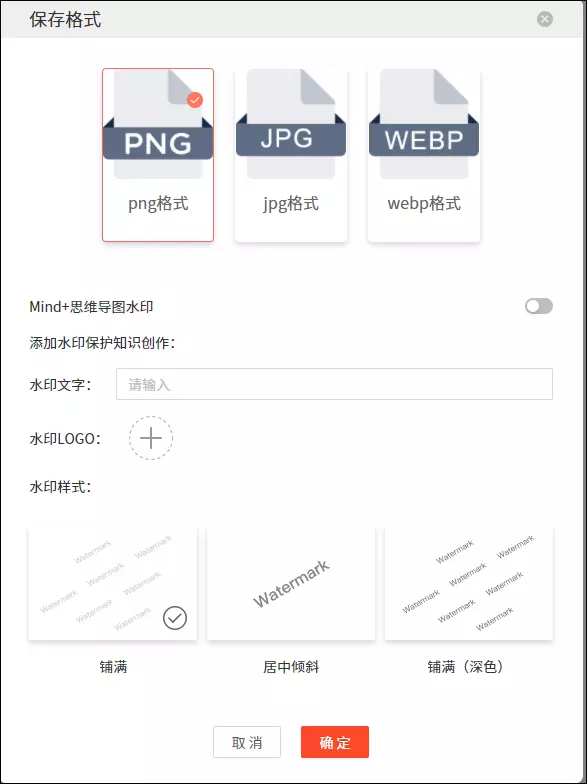
Save image: select the image format, add a watermark, or watermark logo, and set the watermark style, as shown:
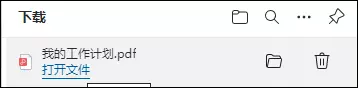
Export PDF: After clicking Export PDF, open the exported PDF in the downloaded file on the right, as shown in the image:
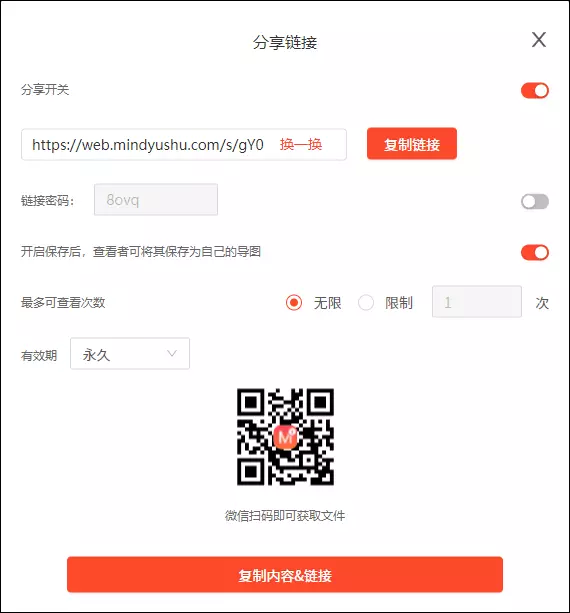
Share link: The sharing link can be shared in the form of a link to any platform such as QQ, WeChat, Weibo, etc. Friends can see the map content when they open the link without downloading software, as shown in the image:
Share to the storm: If you want to share the content of your map so that more people can see it, you can share it to the storm. Other users can see the map content, as shown in the picture:
Print: The map can be printed directly.
Select the node you want to add, click Insert in the top menu bar, select Insert Chart, select the appropriate chart type, double-click the blank area, OK, click the right button on the chart, and click Edit to edit the chart, modify the color scheme, etc.
Select the node you want to add, click Insert in the top menu bar, select Subscript, and enter the subscript content.
Click the Record button on the top menu bar to upload the recording, as shown in the image:
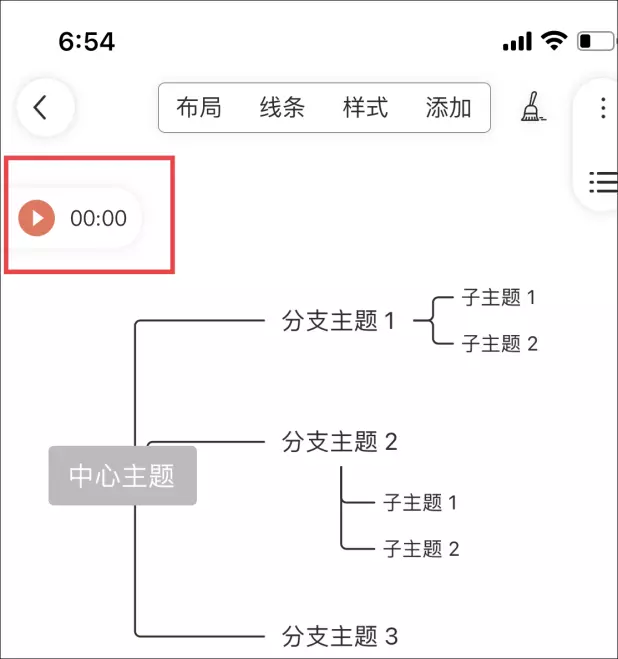
Click the play button on the left to play
Select the node that needs to be linked, click Insert in the top menu bar, select the associated map, and select the map you want to associate in the recently created/archived one, then you can link it, as shown in the image:
Long press on the center node of the map. After the auxiliary line appears, just drag it to the desired position.
In the upper left corner of the node you want to select more than one, press and drag the mouse to the desired position, that is, select multiple nodes, and then modify the settings of the multiple nodes. As shown in the picture:
Select the node and click Style on the right side of the top menu to set the text fill color, border, text, structure, etc.
Using Mind+'s archiving function, pagination mode, and collection and sharing, you can effectively manage cluttered and numerous map documents. Pagination mode: that is, you can create multiple sub-pages in one map. The computer side is as shown in the image

Archive: For maps that are not commonly used that have already been completed, move from recent creations to archives, sort and store them on the bookshelf. You can click on the three points on the far right of the document and select Archive, or go directly to the archive, click on the plus sign, and select Import Map.

Click the outline button on the right side of the top menu bar to enter outline mode and edit, as shown in the image:
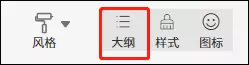
Click the outline button on the right side of the top menu bar to enter outline mode and edit, as shown in the image:
Click on the rightmost side of the document to open the document, rename, copy, move, import shared groups, archive, delete, etc.;
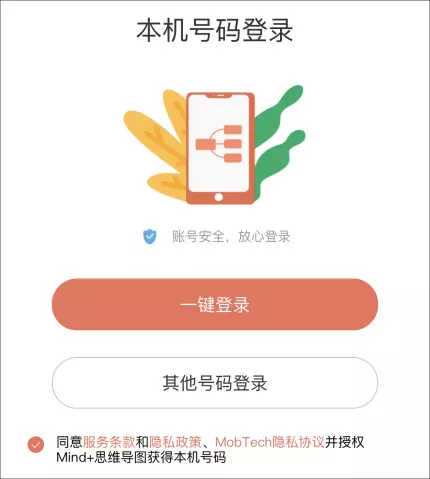
As shown in the image, click Register, enter your phone number, get the verification code, and register your account
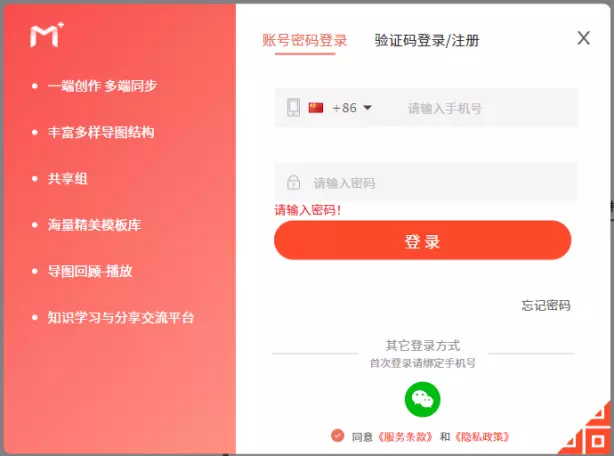
[1] Login: As shown in the picture, you can choose between account password login, WeChat login, and verification code login in various ways.
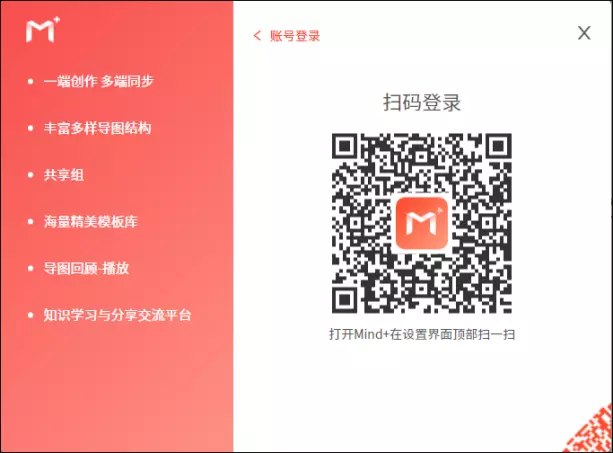
[2] You can also click on the QR code area in the lower right corner. As shown in the image, use the Mind+ App on your phone, scan the code in the upper right corner of the “My” page to log in;
Log in to the official website, URL: https://mindyushu.com,点击学生认证,点击前往认证,获取学信网认证码,保存认证码,如图:

Check out the guide on how to authenticate, as shown in the image:

Return to the certification page, click Student Certification, enter the authentication code, and certify, as shown in the picture:
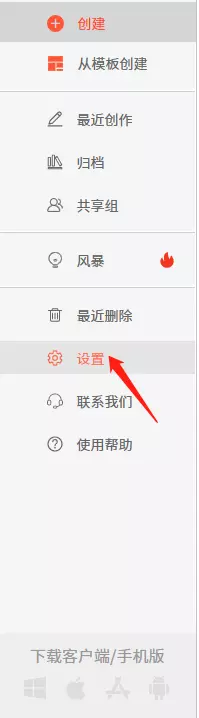
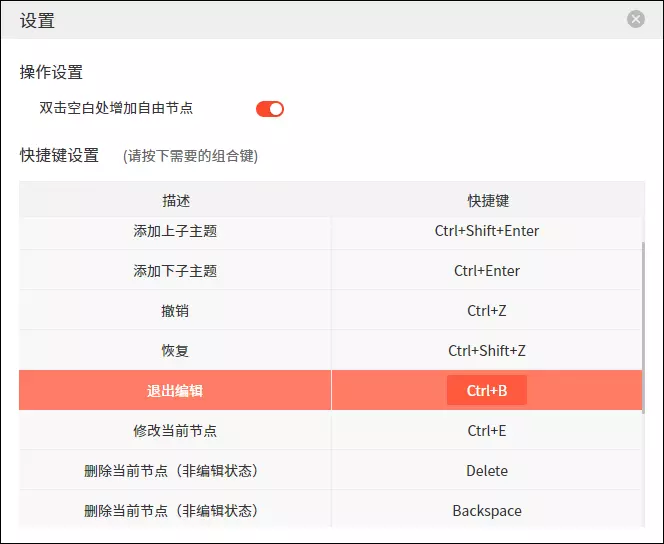
Click Settings in the left menu bar to set shortcuts, as shown in the image:
Click the upgrade button in the upper right corner of the software, select the type of membership you want to activate, and just pay to sign up, as shown in the picture:

Buy M Beans: Can be used to upgrade the number of shared group members, upgrade storage space, use Pay Storm, join paid public groups, etc.
Click User Help in the left menu bar and click on the operation video, as shown in the image:
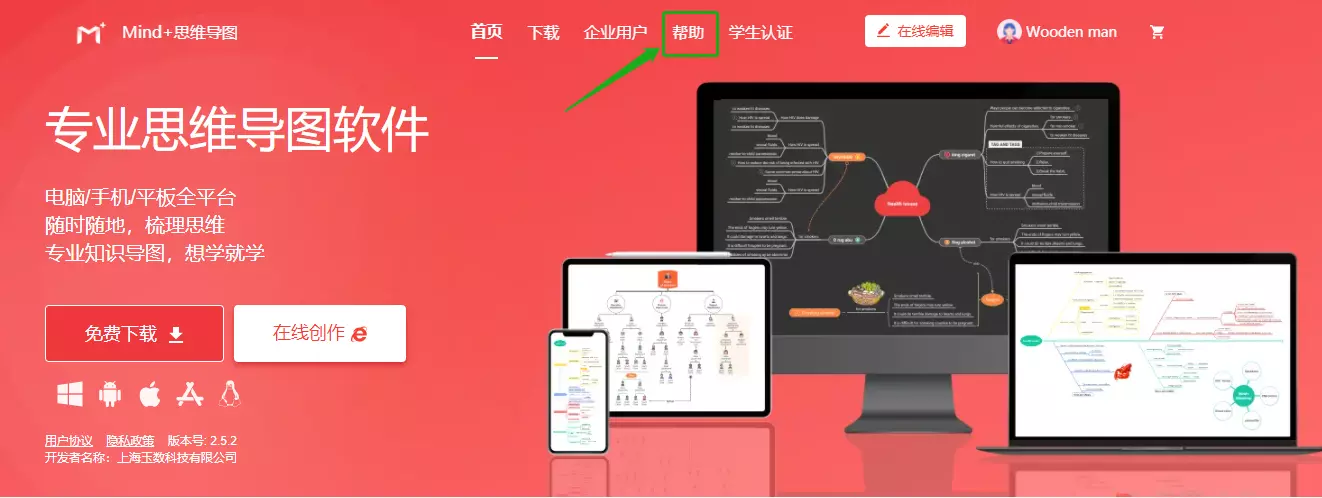
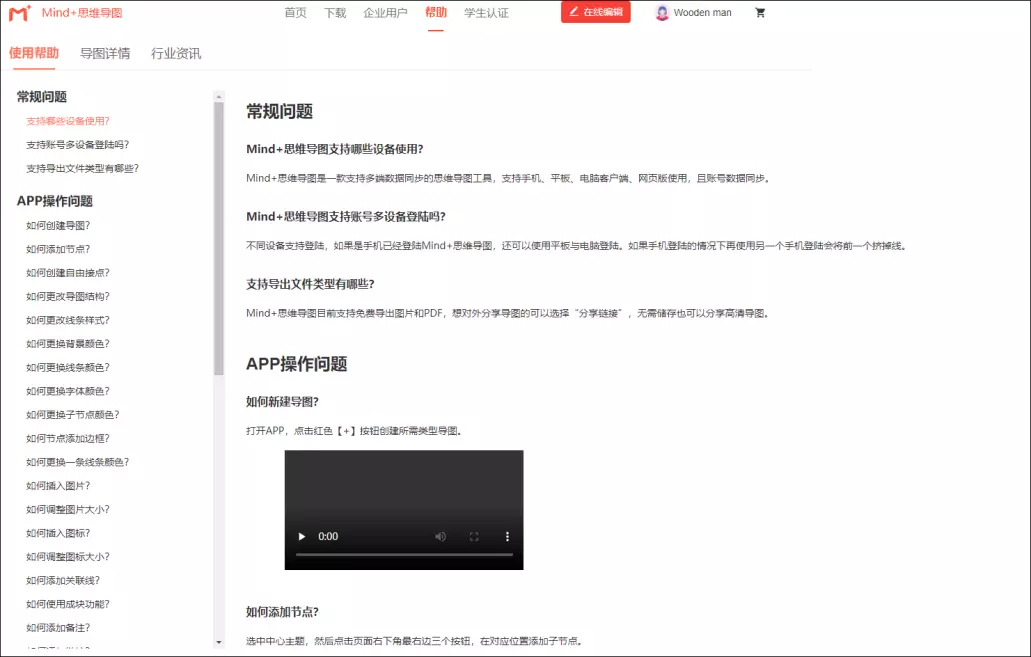
Or check on the official website: enter the official website address: www.mindyushu.com, as shown in the picture:
The same map can be edited by multiple people in real time
Click the area on the right side of the group avatar to enter the document page, as shown in the image:
Click the group profile picture and click the settings button on the right side of the group profile picture to enter the settings page to set it up, as shown in the image:
Click the area on the right side of the group avatar to enter the document page, as shown in the image:
Click the shared group in the left menu bar. At the top left of the page that pops up, click the plus button. The group creation page appears.
Figure 1:
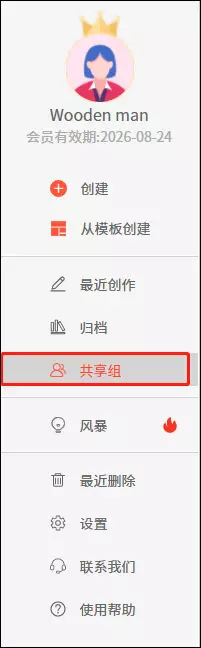
Figure 2:
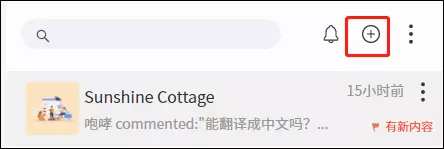
Figure 3:

Method 1: Click on the group profile picture, go to the group information page, click the + button on the shared group member, invite new members, enter the friend's mobile phone number, and click the button on the shared group page to agree to join.
Friends download the software, log in to their account, and click the button in the upper right corner of the sharing group column on the left side of the sharing group page to agree to join;
On the details page of the sharing group, you can check whether you have successfully joined.
Method 2: Click the group profile picture to enter the group information page, and click the share arrow button on the far right of the group profile picture, as shown in the image:
Save the group picture and share the picture with friends via WeChat/QQ, as shown in the picture:
Method 3: Click the shared group, click the three-dot button next to the plus button, enter the group number to join, and the group manager clicks the button to agree to join. The new member has been successfully added. Go back to the group details page to check the status of the addition, as shown in the picture:
Documents shared by sharing groups have the characteristic of instant delivery, that is, all online users can view them, preventing the same document from being sent to multiple people multiple times.
Click the area on the right side of the group avatar to enter the document page, as shown in the image:
Click on the profile page to create a folder and upload data, as shown in the image:
Select the node you want to add, click Insert in the top menu bar, select Insert Link, enter the link address, and OK.
Select the node you want to insert, click Insert in the top menu bar, click Insert Video, select the video, and OK (you can only insert Xiaoyu's 10G size video; the insertion process takes some time, don't worry), or you can right click to delete the video and re-insert the video.